Somebody who can help me to print something in 3D ?

Tony4597

Fan of Printing
Joined
Jan 20, 2021
Messages
97
Reaction score
59
Points
65
Location
Cheshire, UK
Printer Model
Epson Surecolor SC P800
Hi, first time posting here.

I have 3D-printed the two-part scanning jig and I have used it with the 480 patch argyll target provided by pharmacist. I scanned the target with my ColorMunki Design device and obtained very low dE values (max of 1.3 or something like that). I followed the procedure describe here. However, the white point of the profile (as shown on iccview.de for instance) is signficantly lower than for a profile obtained with ccStudio on the same paper (Canon SG-201 paper, see below).

Both profiles provide good-looking prints when tested on popular printer test images (for instance the "Outback print image") but I still worry about the white point.

View attachment 16828

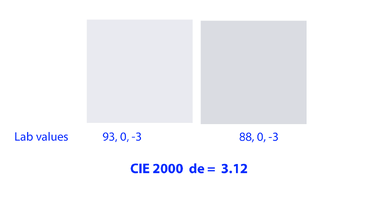
Using the spotread command I noticed that argyll measures a LAB value of about -93 / 0 / -3 when the instrument is pressed on the paper (much closer to the value found by the xrite Software), but that value drops to about -88 / 0 / -3 when it is put on the scanning jig - consistent with my profile.

I believe the ColorMunki must be pressed against the paper but when it sits on the scanning jig there's an almost 2 mm gap between the hole of the instrument and the paper. That likely causes some light diffusion, thus the lower L value? Actually when I press the instrument on the paper and tilt it only very slightly (like 1mm) this is enough to have a lower L reading...

Can you confirm this on your side?

I should mention that my jig is made of white PETG but painting the inside of the slit in black did not change anything.
The fact that both profiles produced good looking prints is obviously a good sign. If you are using Canon own paper and ink how do the profiles compare to Canons own?

I can neither confirm or deny the differences as I have not tried this method properly or made the comparisons you have, however your findings seem to be in agreement with Argylls author.
Quote from Graeme Gill (Developer ArgylCMS)
The Munki/i1Studio isn't designed to be spaced away from the paper - the geometry of the illuminant doesn't allow for that.
So it really should be sliding on the paper itself. A "gotcha" is that the instrument has two small rubber pads that
are designed to stop it slipping when taking individual measurements, and these impede smooth sliding. If

you are mainly doing strip reading you could remove these, or if you leave them they will wear down in time anyway

At the end of the day the differences may be there but insignificant for the type of paper being used and perfectly acceptable without being technically correct accepting that YMMV

FWIW dE difference is just over 3
 

Attachments

  • DE.png
    DE.png
    29.8 KB · Views: 24
Last edited:

Epatcola

Getting Fingers Dirty
Joined
Mar 21, 2020
Messages
31
Reaction score
9
Points
23
Printer Model
various
The Munki/i1Studio isn't designed to be spaced away from the paper
I have been messing with this

cmguide.jpg


The idea is the cm/i1studio pushes into it. The Vs front and rear let you accurately align on the patches then a simple rule one side or the other is used to keep alignment while you scan. The USB cable obscures your view at the back so I extended the V past the body of the connector. Right angle mini USB cables are available which could help.

The main problem is the bottom of the i1studio is all rounds and curves so it is difficult to model something which it will stay pushed into. It probably needs some vertical tabs added to align and grip better.

I don't have much profiling to do and so lack incentive to spend more time on this. I thought I would share the idea.
 

Tony4597

Fan of Printing
Joined
Jan 20, 2021
Messages
97
Reaction score
59
Points
65
Location
Cheshire, UK
Printer Model
Epson Surecolor SC P800
....
The idea is the cm/i1studio pushes into it. The Vs front and rear let you accurately align on the patches then a simple rule one side or the other is used to keep alignment while you scan. The USB cable obscures your view at the back so I extended the V past the body of the connector. Right angle mini USB cables are available which could help.

The main problem is the bottom of the i1studio is all rounds and curves so it is difficult to model something which it will stay pushed into. It probably needs some vertical tabs added to align and grip better.

I don't have much profiling to do and so lack incentive to spend more time on this. I thought I would share the idea.
That looks like a good solution, keeping the unit closer to the paper as the original design intent.
 

Dr_Nick

Print Lurker
Joined
Feb 26, 2025
Messages
2
Reaction score
0
Points
1
Printer Model
Canon TS8350
The fact that both profiles produced good looking prints is obviously a good sign. If you are using Canon own paper and ink how do the profiles compare to Canons own?
It's an entry level Canon printer (TS-8350) for which Canon does not provide icc profiles so a comparison is not possible. I am using Canon ink and paper (SG-201, semigloss).

I can neither confirm or deny the differences as I have not tried this method properly or made the comparisons you have, however your findings seem to be in agreement with Argylls author.
Quote from Graeme Gill (Developer ArgylCMS)
The Munki/i1Studio isn't designed to be spaced away from the paper - the geometry of the illuminant doesn't allow for that.
So it really should be sliding on the paper itself. A "gotcha" is that the instrument has two small rubber pads that
are designed to stop it slipping when taking individual measurements, and these impede smooth sliding. If

you are mainly doing strip reading you could remove these, or if you leave them they will wear down in time anyway

At the end of the day the differences may be there but insignificant for the type of paper being used and perfectly acceptable without being technically correct accepting that YMMV

FWIW dE difference is just over 3
I tested other colours and there is always a signficant difference (dE 76 of 6-8 for yellow, red, blue and green and about 2 for black - not only L* but also a* and b* do change) but then a more systematic test (measuring in the EXACT same spot with and without the rig) would be necessary to really figure out if there's some kind of constant shift.

I am still not sure how much this affects the profile quality. The gamut volume of the "jig-measured" icc is noticeably smaller than the one measured with the xrite software (no jig). But then again, testprints look pretty close with both profiles so maybe the reduced Gamut volume is not an issue. Both profiles look smooth with very similar shapes and no strange features.
 
Last edited:

Dr_Nick

Print Lurker
Joined
Feb 26, 2025
Messages
2
Reaction score
0
Points
1
Printer Model
Canon TS8350
That looks like a good solution, keeping the unit closer to the paper as the original design intent.
Yes, I also thought about something like that but closer to the design of @Artur5 - without the bottom plate. Probably the frame would need to be made a bit thicker to avoid the jig from flexing.
 
Top