Using ArgyllCMS + Colormunki to produce excellent printer profiles

Roy Sletcher

Indolent contrarian
Platinum Printer Member
Joined
Dec 20, 2010
Messages
978
Reaction score
1,007
Points
233
Location
Ottawa, CANADA
Printer Model
Canon Pro-100, and Epson 3880
Emulator said:
Hi Emu,

Thanks for the reply.

Yes I found that site, and will review the install instructions in more detail.

Have been too busy last couple of days to revisit the scene, but think a previous message may have given the clue I needed.

I have been trying to install my colomunki driver that came with the xrite software.

Apparently Argyll has its own driver which will hopefully solve the problem.

We will see what happens.

Roy
 

cls

Print Addict
Joined
Jan 13, 2013
Messages
413
Reaction score
152
Points
188
Location
Germany Hamburg
Printer Model
8560, 8570, 1400, 1500W, P50 e
Did a little tweaking and I was able to fit 870 patches onto ONE Sheet without any problems.
Reading Device is the Eye-One Pro / EFI ES-1000, this wouldn't work for the ColorMunki!

Only thing you have to do is tweak the generated TIFF Files a little bit or do this while printing. The color patches a far to "left" on the page and if you print this page borderless (retain size) you
would end up with a cut Colorpatch Row. So just move the image from the "centered" position a little bit to the right.


870 Patches on one A4 Sheet
Code:
targen -v -d2 -G -g90 -t -f870 "870_A4"
printtarg -v -ii1 -a0.82  -b -T360 -P -m1 -pA4 -L "870_A4"
chartread -v -H -B -T0.4 "870_A4"
colprof -v -qh -S AdobeRGB1998.icc -dpp -D"PRINTERMODELL INKSET PAPERTYPENAME" "870_A4"
1740 Patches on two A4 Sheet
Code:
targen -v -d2 -G -g100 -t -f1740 "1740_2A4"
printtarg -v -ii1 -a0.82  -b -T360 -P -m1 -pA4 -L "1740_2A4"
chartread -v -H -B -T0.4 "1740_2A4"
colprof -v -qh -S AdobeRGB1998.icc -dpp -D"PRINTERMODELL INKSET PAPERTYPENAME" "1740_2A4"
2610 Patches on three A4 Sheet
Code:
targen -v -d2 -G -g160 -t -f2610 "2610_3A4"
printtarg -v -ii1 -a0.82  -b -T360 -P -m1 -pA4 -L "2610_3A4"
chartread -v -H -B -T0.4 "2610_3A4"
colprof -v -qh -S AdobeRGB1998.icc -dpp -D"PRINTERMODELL INKSET PAPERTYPENAME" "2610_3A4"
 

Tudor

Print Addict
Platinum Printer Member
Joined
May 6, 2011
Messages
505
Reaction score
203
Points
183
Location
Cluj-Napoca, Romania
Printer Model
Epson L800, 1400; ML-2165W
I have some questions regarding the use of colormunki+argyllCMS:

1. You can print more patches on a sheet of paper by using a larger page format in printtarg, then cropping the resulting .tif in an image editor. Doesn't the cropping affect the patches somehow... color wise...?

2. Some use -d2, others use -d4 in targen. Which one is the right one?

3. Which is the smallest patch size (in mm) that can be read correctly with colormunki?

4. http://www.youtube.com/watch?v=_RoxKe7cBvQ This is a very clever approach, but doesn't the extra distance between the sensor and the paper affect the readings?
 

pharmacist

Printer VIP
Platinum Printer Member
Joined
May 29, 2007
Messages
2,646
Reaction score
1,411
Points
313
Location
Ghent, Belgium
Printer Model
2x SC-900, WF-7840, TS705
1. No: you can test it with the color check after cropping.
2. D2 is for pseudo-RGB printers and 99.99% of most printer driver drivers are pseudo-RGB printers and need RGB input, unless you are using a RIP like Printfab, which needs CMYK input.
3. 8 mm is still acceptable.
4. Negligible: I compared profiles using the Colormunki method with standard large page patches with direct contact and the small patch method using my home-made ruler causing the Colormunki slightly lifted from the paper surface and no difference at all.
 

pharmacist

Printer VIP
Platinum Printer Member
Joined
May 29, 2007
Messages
2,646
Reaction score
1,411
Points
313
Location
Ghent, Belgium
Printer Model
2x SC-900, WF-7840, TS705
Colormunki_profile_Epson_Pro_3880_OCP-K3.jpg
ArgyllCMS_printerprofile_Epson_Pro_3880_OCP-K3.jpg
ArgyllCMS_versus_Colormunki_P_BPC_on.jpg
ArgyllCMS_versus_Colormunki_P_BPC_off.jpg
Today I was experimenting with a box of the United Office/Sihl glossy paper with both ArgyllCMS and Colormunki and to detect some differences.

I was using two methods:

-Colormunki 4-in-1 method on a single sheet of paper using 2 optimizations
-ArgyllCMS method with a 648 patch target file on a single sheet of paper

Printing using perceptual intent and using both Black Point Compensation on and off to see the differences:

-Both profiles are very similar, but using the ArgyllCMS produced profile there is a significant contrast difference in the blacks/black&white area's concerning checking or unchecking the Black Point Compensation option: using the Colormunki profile there is hardly any difference between the BPC being on or off, but the ArgyllCMS profile does seem to benefit when BPC is off (unchecked), which will yield much better contrast in the shadows and deeper blacks. On the other hand out-of-gamut colors are rendered more vividly using the ArgyllCMS profile.
 

Tudor

Print Addict
Platinum Printer Member
Joined
May 6, 2011
Messages
505
Reaction score
203
Points
183
Location
Cluj-Napoca, Romania
Printer Model
Epson L800, 1400; ML-2165W
With a patch width of ~8,3mm I got:

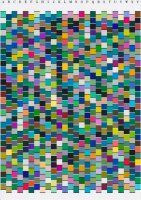
725 patches/A4page A4Target725patches.jpg

printtarg -v -icm -a0.65 -b -t600 -C -L -M1 -P -h -p235x350 A4

The resulting image needs to be modified: numbering moved lower, cropping to A4 dimensions ( 1mm L&R margin) and resizing to A4.

168 patches/4x6page 4x6Target168patches.jpg

printtarg -v -icm -a0.65 -b -t600 -C -L -M1 -P -h -p120x200 10x15

Cropping and resizing to 4x6 keeping the L&R 1mm margin.

I print the targets with Qimage (prtr icc, interpolation and sharpening off) borderless, minimum expansion. No problem reading the targets using the glider ( thank you for the idea, @pharmacist ).


With a patch width of 8mm you can get 806patches/A4, but that's a little tight.
 
Last edited:

pharmacist

Printer VIP
Platinum Printer Member
Joined
May 29, 2007
Messages
2,646
Reaction score
1,411
Points
313
Location
Ghent, Belgium
Printer Model
2x SC-900, WF-7840, TS705
Hi Tudor,

Almost right: I just came to the conclusion my patches are a bit larger (almost 9 mm width). I use the -i1 method to get the above chart (ArgyllCMS will warn you about a different layout, but it reads without any problems). I have tried another extra row on the chart + extra patch per row, but I had difficulty to read it in a reliable way (so: 25 x 28 = 700 instead of 24 x 27 = 648).

Now I have found this target from a commercial printer profile service center in Belgium:

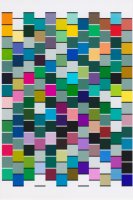
marcenciel_a4_rgb_02_2013_nl2.jpg


It has only 574 patches to produce a profile. Now with the modified ArgyllCMS you can get much more patches on a single sheet of A4 paper. Mine has 648 patches. For pseudo-RGB printer drivers this is sufficient to get a very satisfactory printer profile (see above compared to the Colormunki method with 2 optimizations).

If you want to create this ruler yourself (note: A3 printer necessary to print):

ArgyllCMS_ruler_for_Colormunki.jpg


Use papersetting: A3, borderless printing (no expansion) on a single sheet of strong/thick paper to print this ruler design on and glue the pieces together to make the ruler. It is designed for the 648 patch chart I use.

I just discovered the system crops my design too much. Those interested can contact me to get the full version of the ruler design.
 

Tudor

Print Addict
Platinum Printer Member
Joined
May 6, 2011
Messages
505
Reaction score
203
Points
183
Location
Cluj-Napoca, Romania
Printer Model
Epson L800, 1400; ML-2165W
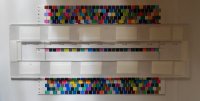
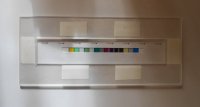
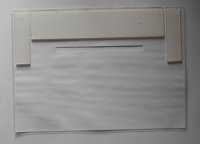
I already made 2 gliders, one for A4 and one for 4x6. I used laminated plain paper for the base and plexiglass for the ruler (laser cut). Glued them using double sided bonding tape. You can see in the photos that the gliders are a little curved. That helps when you have to move to the next row (actually the plexi was already bended, I got it from a scrapyard some time ago :) ), but when you hold it for the reading it flattens. It works great, a lot easier to use than a simple ruler on a template ( used it before the glider).

When I made the calculations for the A4 glider I didn't want to keep the lettering on the target, but then I decided I do, so a small modification was needed to the starting point. Also, I don't own a A3 printer, so I had to print a poster of 2 A4s to make the base template.

A4ColormunkiGlider.jpg 4x6ColormunkiGlider.jpg

I scan a row on the A4 in 8 sec (from beep to beep :) ) and it takes around 50-55 minutes for a 4 page profile. For the 4x6 - 5 sec with 3,5 minutes/page.
 
Last edited:

pharmacist

Printer VIP
Platinum Printer Member
Joined
May 29, 2007
Messages
2,646
Reaction score
1,411
Points
313
Location
Ghent, Belgium
Printer Model
2x SC-900, WF-7840, TS705
Hi Tudor, that his very nice. Even better compared to my solution :thumbsup. We are learning everyday from each other. Unfortunately I do not have a laser cutter to make a ruler like yours.
 
Last edited:

Tudor

Print Addict
Platinum Printer Member
Joined
May 6, 2011
Messages
505
Reaction score
203
Points
183
Location
Cluj-Napoca, Romania
Printer Model
Epson L800, 1400; ML-2165W
I don't have one either, I had the two pieces cut at a local shop. The glider can be made with strips of plexi, I only wanted a single piece for strength.

This is the one I used before for the 4x6: 4x6v1Glider.jpg
 
Top