Tough clog in Epson R220

PeterBJ

Printer VIP
Platinum Printer Member
Joined
Nov 27, 2010
Messages
5,113
Reaction score
4,976
Points
373
Location
Copenhagen Denmark
Printer Model
Canon MP990
Yes, I will take care when working with these tough solvents and use both gloves and protective goggles. Getting solvent into your eyes is not a pleasant experience, I know from my work at a paint manufacturing plant.

I found a similar product from a Danish supplier: https://www.elfaelektronik.dk/elfa3~dk_en/elfa/init.do?item=80-795-36&toc=0 , I hope the product will be in stock in a couple of weeks. 1€ = 7.46 DKK

I have searched for revitalizing rubber rollers and seen the suggestion to use products intended for restoring grip in table tennis bats, so maybe a shop selling sports equipment also has something useful?
 
Last edited:

elerouxx

Getting Fingers Dirty
Joined
Jan 25, 2014
Messages
21
Reaction score
10
Points
22
Printer Model
R220
This forum thread has been very useful to me, thank you all.
I couldn't get any similar products to these Rejuvenators, but the silicon grease seemed to work fine on the rubber parts that pick up the paper.

I'm very happy to see such an improvement in paper feed in my R220. I thought it was a lost cause, but ended up working pretty well! I just fed the printer with some assorted papers (new paper, thick art paper, very thin canson paper, a sheet of labels) and I didn't have a single jam!

All that it needed was to get back the rubber its rubber texture and the silicon grease did that, and it's not a solvent.

It's pretty much like trying to pass pages on a book with a dry finger - it doesn't work. But you damp your thumb very little to help it pick the pages easily. The rubber band in my printer was dry, with a "dusty" feel, like a dry thumb, so the paper slipped. Now it feels like rubber again. Be aware, guys, that, as PeterBJ says, you need to apply VERY LITTLE amount of the product. I don't recommend spraying any product directly on the rubber parts, but instead putting a very small amount of the product on a piece of cloth or on your finger (with gloves) and applying it carefully. Laser printers use big rubber rollers, but in inkjet printers (at least in my Epson) the rubber part is but a small rubber roller, facing a rubber band, on the right part of the paper feeding tray.

On the other hand, the print head (nozzle check) is worse than before and all I did so far was to spend ink and paper. I used the pad+solution technique overnight some times now. It seems that it drained ink from the cartridges. But still, the print head pattern hasn't improved. So I think it might be worthy to remove the print head and see what's happening down there, or maybe on its circuits.

Re-reading this thread was useful. RWP (the author) fixed the printer by removing and manually cleaning the head. Unfortunately the tutorial he posted is not good anymore (since it's all images with no text, and images are missing).

So I'd appreciate any instructions to remove the R220 printhead, or a similar printer. The few tutorials I found are (as RWP said) complex and mean to dismantle most of the printer. I'm pretty sure it's possible to remove the head with a minimum effort, I only havent't been able to find instructions for that.
 

PeterBJ

Printer VIP
Platinum Printer Member
Joined
Nov 27, 2010
Messages
5,113
Reaction score
4,976
Points
373
Location
Copenhagen Denmark
Printer Model
Canon MP990
Unlike Canon print heads Epson print heads are not user replaceable. It is generally not recommended to remove them. Special tools and an adjustment program might be necessary for reinstalling and calibrating the print head. I found the service manual, but haven't read it in detail. The service manual might help in solving the problem.

Link to the service manual here: http://elektrotanya.com/epson_stylus_photo_r220_r230.pdf/download.html . Before download see this instruction: http://www.printerknowledge.com/thr...-post-them-here-sticky.5071/page-9#post-36684

I'm no Epson expert, but maybe one of the Epson experts will comment on the print head removal?
 

elerouxx

Getting Fingers Dirty
Joined
Jan 25, 2014
Messages
21
Reaction score
10
Points
22
Printer Model
R220
Thank you again. The diagrams in the manual were useful, although it's pretty technical and supposses that printer will be taken appart.

I decided to give it a try and indeed, removing the print head is absolutely easy - just needed to be careful and remove 3 screws (one on the side, two inside the carriage, near the nozzle pins). Now the nozzles/printhead part is loose. There are 2 flat cables attached to it and I'm googling instructions about how to disconnect them. I won't just pull them out and break the whole thing.
 

websnail

Printer VIP
Platinum Printer Member
Joined
Oct 27, 2005
Messages
3,666
Reaction score
1,349
Points
337
Location
South Yorks, UK
Printer Model
Epson, Canon, HP... A "few"
On the rubber restorer topic here's what I've used:
http://www.amazon.co.uk/AF-International-Platen-Cleaner-Restorer/dp/B0012IKSHO

As for the printhead cleaning... You should try to avoid removing the printhead if you can and to be honest you shouldn't need to if you use the passive cleaning technique I mentioned in this post:
http://www.printerknowledge.com/threads/tough-clog-in-epson-r220.6096/page-2#post-67419

... but given that there are plenty of instances when adventure called and we've cut ourselves loose to figure stuff out I hope you don't hit any problems when you put it all back together again..
 

elerouxx

Getting Fingers Dirty
Joined
Jan 25, 2014
Messages
21
Reaction score
10
Points
22
Printer Model
R220
lol I like that last statement. Yes, we know what we are risking. Or not... anyway, I like to fix things, and this will be an amazing printer now that it's feeding properly. I'm risking it a little yes but since it's so old, i think it's worth the risk. My main loss in case of disaster is actually the cartridge kit and inks i just bought :)

I succeded in removing the printhead. Im carefully washing it with a syringe and solution. I leave it resting on a dish with a little of the solution now and see what happens.
 

PeterBJ

Printer VIP
Platinum Printer Member
Joined
Nov 27, 2010
Messages
5,113
Reaction score
4,976
Points
373
Location
Copenhagen Denmark
Printer Model
Canon MP990

elerouxx

Getting Fingers Dirty
Joined
Jan 25, 2014
Messages
21
Reaction score
10
Points
22
Printer Model
R220
Sorry if I am flooding this thread with so frequent updates.
I flushed distilled water (with little pressure) thru the head nozzles with a syringe. Indeed, looking at the water jets against a black background, I saw some missing jets at first, but eventually the jets got regular, and now look like a perfect row of fine rain. At least to my eye I think all nozzles are flowing now.

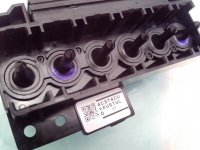
I had however an unhappy finding: the Cyan and Yellow nozzle pins (the ones that go into the cartridge) have a very think crackings on the thick part of their bases, where they join the plastic head assembly. With the syringe pressure, it sprays water out of these cracks. I guess it isn't such a problem with the normal printhead pressure which is far less. I haven't experienced a visible ink leak. Anyway, I wonder if I should try to brush the affected parts with a small brush and a very little amount of some kind of glue or paint. I don't want to thicken the plot however... :)
 

PeterBJ

Printer VIP
Platinum Printer Member
Joined
Nov 27, 2010
Messages
5,113
Reaction score
4,976
Points
373
Location
Copenhagen Denmark
Printer Model
Canon MP990
I wonder if the cracks are chemical stress cracks, caused by a combination of alcohol in a cleaning fluid and pressure? I once cleaned a refillable electronic lighter that contained metal and plastic parts with isopropyl alcohol on a small paint brush. A couple of seconds after the alcohol wetted the plastic parts, the lighter flew apart. The plastic parts could not be dissolved in alcohol, nor did they seem to be affected by the alcohol, now that they were no longer under stress (pressure from the gas)

See this: http://en.wikipedia.org/wiki/Environmental_stress_cracking

I don't know which glue is best for a repair, but give it a try, as you have nothing to loose with the printer.
 

elerouxx

Getting Fingers Dirty
Joined
Jan 25, 2014
Messages
21
Reaction score
10
Points
22
Printer Model
R220
See this: http://en.wikipedia.org/wiki/Environmental_stress_cracking

I don't know which glue is best for a repair, but give it a try, as you have nothing to loose with the printer.

Very interesting reading. I think I might have stressed these beaks when I was first trying to insert them into the plastic hose and syringe, when I wanted to flush cleaning fluid into them. Maybe the alcohol, although I used a very small amount on a q-tip. I think it was the pressure combined with another factor that is plastic aging.

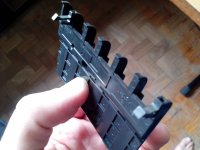
One of the plastic parts I removed, for instance, has one of its tabs broken/loose. The crack is not visible in the picture, but one of these 2 tabs on top of the part will break loose at anytime. Plastic gets rotten and fragile with time.

2014-02-01 15.36.41.jpg

I decided to give the cracks a brushstroke of acrylic paint, which from my small artistic experience, I know will dry and stick to the plastic, and once dry it won't be water-soluble anymore. I don't know if it will solve the leaking, but I don't want to use any kind of glue because it will either be soluble with water, or will be too agressive (superglue) and penetrate the plastic crack ruining the part from the inside. Maybe clog the nozzles definitely.

2014-02-01 15.34.22.jpg

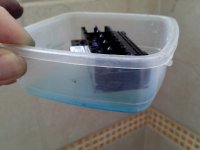
Here's the printhead sitting on a small tray with some solution, with the paint.
2014-02-01 15.34.08.jpg

I could not take a picture showing the ink jetting from the printhead nozzles.

I think I'll have the results of all this by tonight. Thank you very much for your close assistant and attention, PeterBJ.
 
Top