Help wtih Canon i560

Evil Elvis

Newbie to Printing
Joined
Jan 26, 2010
Messages
2
Reaction score
0
Points
6
embguy said:
I am working on a Canon i560 and a i850 with the exact symptom as emerald's i560.

After doing a cleaning cycle, all colors are normal.

http://www.nifty-stuff.com/forum/uploads/4626_i850b.jpg


After let it sits for 30 minutes, magenta ink is getting into the yellow.

http://www.nifty-stuff.com/forum/uploads/4626_i850c.jpg

I have read emerald's post #29 on this thread over and over. My conclusion: What emerald did was a thorough cleaning the ink path from the ink inlets through the internal channels and the nozzles.

On post #26, "Trigger 37" had commented that emerald's problem was clogged nozzles and not cross contamination.

I like to hear your comments on my conclusion before doing anything.
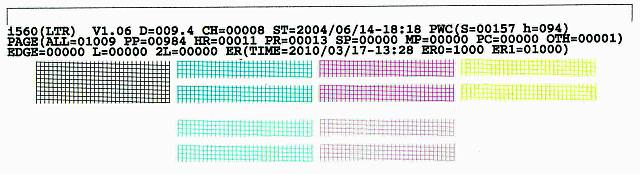
How do you get the i560 to print those solid colour purges? (if you dont mind me asking)

Sorry to hijack this thread, as you can see by my post count im new here.

i have stripey pictures being printed, wether it coincides with a new pc or just coincdence i dont know, im running windows vista64 bit.

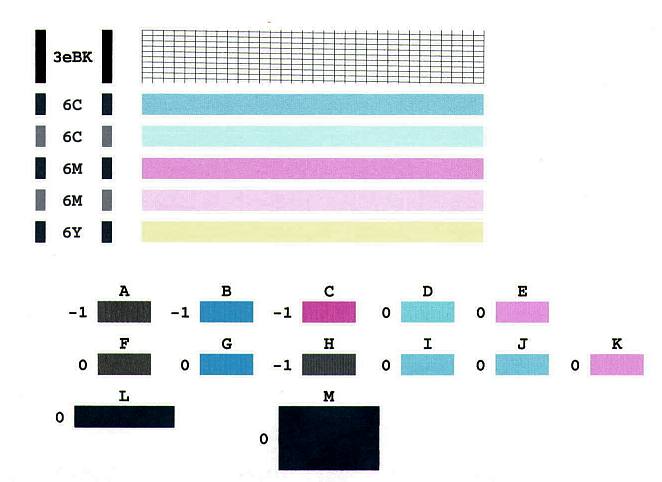
I have cleaned the print head in cartridge cleaner and dried it out etc and replaced it in the machine with new cartridges. It is printing better but still stripey, when i print a printhead page there is no I and only A,f and E have any solid clour, the rest are chequered.
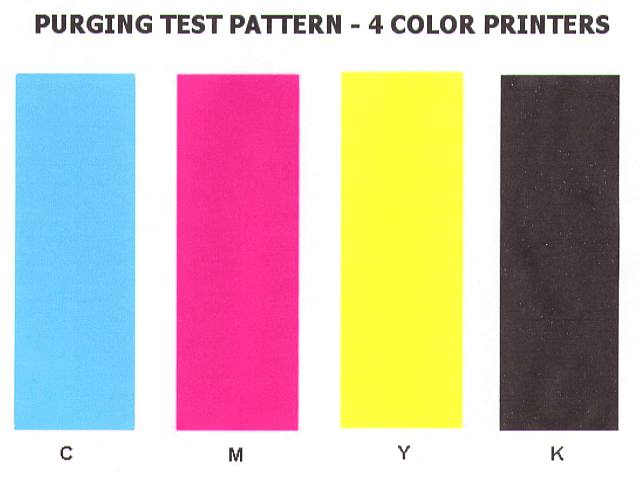
I have tried the purge test thats all ok, short of buying a new printhead im stumped. weird thing is it prints fine in text.Any ideas?

Does anyone have a printhead that could be loaned to test in my machine? Or have a machine that i could test mine in? im based in corringham in essex?
Thanks
baz
 

Evil Elvis

Newbie to Printing
Joined
Jan 26, 2010
Messages
2
Reaction score
0
Points
6
I just anwsered one of my own question, i cut and pasted the pattern above and i got horizontal stripes on cyan, majenta and blue any ideas? its like its missing a line but its uniform on all colours? The balck is solid as i supected it would be.
 

embguy

Printer Guru
Joined
Mar 9, 2009
Messages
331
Reaction score
3
Points
141
Evil Elvis said:
I just anwsered one of my own question, i cut and pasted the pattern above and i got horizontal stripes on cyan, majenta and blue any ideas? its like its missing a line but its uniform on all colours? The balck is solid as i supected it would be.
What is the model number of your printer? Is it a i560?
Please do a nozzle check and upload the nozzle check for analysis. Use the "Upload" tab on the top of this page to upload nozzle check image.
 

emerald

Getting Fingers Dirty
Joined
Sep 9, 2009
Messages
90
Reaction score
0
Points
33
Location
Nebraska, USA
My Canon i560 printer is displaying cross contamination problems again. See post #29 on this thread. It describes the action I took that temporarily fixed the problem. After two months I refilled the three color cartridges - yellow, magenta and cyan. After doing so, the yellow in a four color bar test pattern shows orange banding which indicates that magenta is being introduced into the yellow channel. I suspected that I had overfilled the cartridges or a problem had developed in one or more of the cartridges. I exchanged them with Canon cartridges known to be working well in another printer. The banding problem persisted in the i560 printer with the different cartridges and the refilled cartridges from the i560 printer worked perfectly in the other printer. In the earlier episode the banding condition cleared up after one cleaning only to return after setting idle for a half hour. This time the orange banding persisted after three cleanings. I placed the print head on four folds of a paper towel and attempted to flush the yellow channel by using a syringe and a plastic tube fitted over the yellow print head inlet. I removed the rubber seal surrounding the yellow inlet, placed the clear plastic tube over the yellow inlet, inserted the the syringe filled with water into the clear plastic tube and proceeded to flush the yellow channel. While doing so, I noticed fluid welling out of the magenta and cyan inlets. After flushing the yellow channel clear using only water under moderate syringe pressure, the magenta and cyan inlets continued to well fluid out of the magenta and cyan inlets when the syringe pressure was increased and the print head was lifted clear of the paper towel. I'm convinced that the gasket between the plastic print head body and the ceramic section has lost its seal. I loosened and re-tightened the two small Phillips screws which fastens the ceramic section to the plastic print head body. It changed nothing. I could remove the ceramic section from the plastic print head body to clean and dry the pliable gasket as I did in the original fix but the seal will probably fail again over time unless I apply a gasket sealant or take some other measure. I don't want to try. I ordered a new print head.
 

Grandad35

Printer Master
Platinum Printer Member
Joined
Feb 24, 2005
Messages
1,669
Reaction score
182
Points
223
Location
North of Boston, USA
Printer Model
Canon i9900 (plus 5 spares)
You stated that you are through playing with this print head, but in case you change your mind you could try some gasket shellac as a sealant. Because it would obviously not be good to get any of this sealant into the ink channels, I would spread a very thin layer (on the order of 50 microns thick) onto a smooth surface and then gently press each side of the gasket onto the shellac to transfer a very thin coating to each side of the gasket. Let it harden for a short time - you will first have to play around with some pieces of cardboard to judge how much drying time is needed for it to set up as much as possible while remaining tacky. Carefully place the gasket in position so that it does not need to slide around during assembly and finish the assembly.

This gasket just lays on the flat ceramic surface, and the rubber is fairly easy to slide on that surface. The shellac will act as a glue to hold it in place.
 

embguy

Printer Guru
Joined
Mar 9, 2009
Messages
331
Reaction score
3
Points
141
emerald said:
I don't want to try. I ordered a new print head.
Please report back after installing your new print head using the same cartridges. Thanks
 

emerald

Getting Fingers Dirty
Joined
Sep 9, 2009
Messages
90
Reaction score
0
Points
33
Location
Nebraska, USA
This is to report the results of a new print head installed in my Canon i560 printer. See post #44, this thread. The accompanying graphics are the results of test patterns using the four original i560 cartridges - the pigment black and the three colors, magenta, cyan and yellow. I also made tests using three color cartridges from another printer, a Canon S820. Both sets of cartridges are OEM Canon cartridges which have been refilled perhaps 3 or 4 times. While printing large solid patterns I noticed that the yellow cartridge from the S820 displayed slight banding which I attribute to deterioration of cartridge ink flow. I saved the yellow ink and foam from the cartridge by blowing into the refill hole while holding it over an empty plastic butter container. Then I used warm water and a plastic squeeze bottle equipped with a tapered tip to flush it clean. I dried it as best I could by blowing into the refill hole while holding it over a sink. Using a syringe I refilled the yellow cartridge with the saved ink and topped it off with new Hobbicolor ink. The damp sponge did not absorb the yellow ink evenly at first. After about 15 minutes, the ink appeared to be spread evenly in the bottom half of the cartridge. I lightly tapped the cartridge on the sink in different directions in hopes of ensuring more even distribution.

Anyway, the results now are perfect four-color bar test patterns. with both sets of ink cartridges. The original problem was contamination of the yellow from the magenta after the printer set idle for a half hour. There's no sign of that problem now. I'm convinced that the problem was confined to the print head, nothing else.

Grandad35: Thanks for the tips on using the Permatex "Indian" gasket shellac. I'm saving the old Canon QY6-0064 print head and perhaps someday I'll attempt to repair it using the gasket shellac. Gasket shellac brings back memories of fixing water pumps and thermostats on old Chevys. A 1941, a 1950 and a 1953 Chevy from our early married days come to mind. I had better luck fixing those old cars than I do with these "new fangled contraptions."

embguy: I followed your post sharing the same kind of problem I have. I would be interested in your experiences

 
Top