You are using an out of date browser. It may not display this or other websites correctly.
You should upgrade or use an alternative browser.
You should upgrade or use an alternative browser.
Help wtih Canon i560
- Thread starter chobo2
- Start date
- Thread starter
- #22
Hmm I tried blowing into it and nothing seems to be coming out of it. I tried blowing as hard as I could and nothing came out. I even took the blow drier to see if that would have any effect on it. But nothing.Tin Ho said:Yes. That's the vent to blow air into. Ink should be forced out of the exit port easily. Get 2 -3 cc of ink out. The cartridge should work find afterwards.
So not sure what I am doing wrong.
I guess you did not blow all the air into the vent. Blow drier won't do it because most of the air will blow by the vent but not into the vent. It's not like trying to blow out a candle light. It has to be like blowing a balloon.
- Thread starter
- #24
Well I will try one more time in the next few days. I don't know I blow quite a bit and I tried different angles. The blow drier was just the last resort test.Tin Ho said:I guess you did not blow all the air into the vent. Blow drier won't do it because most of the air will blow by the vent but not into the vent. It's not like trying to blow out a candle light. It has to be like blowing a balloon.
Otherwise I will just take it out with the syringe.
emerald
Getting Fingers Dirty
I searched the Inkjet Printer Forum for a condition that matches mine - cross contamination? This string discusses at length the symptoms, possible causes and cures.
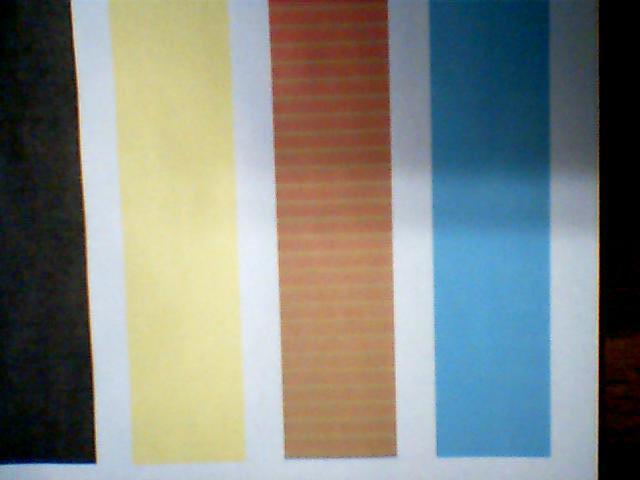
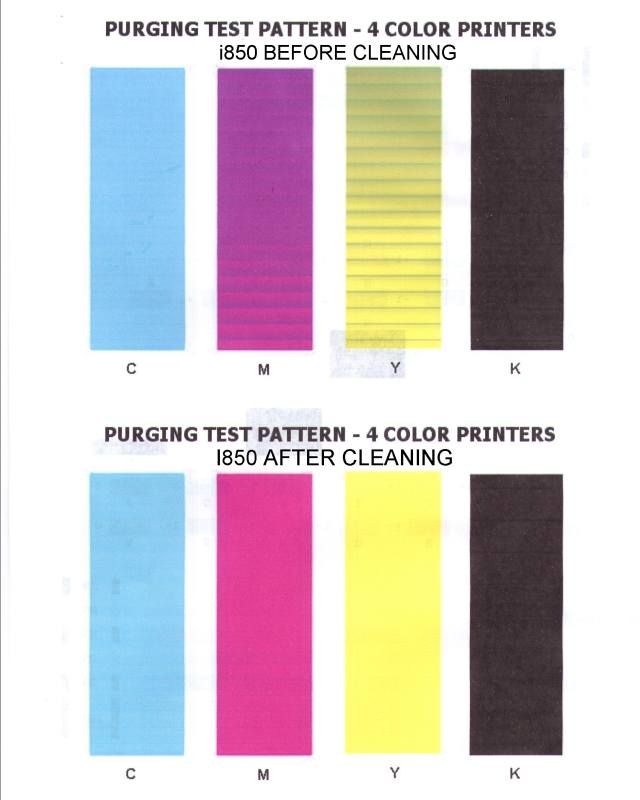
My Canon i560, when printing a 4 color purge pattern, displays a banding pattern in the yellow and magenta color bars. Two normal cleaning cycles clean it up but the problem returns overnight. I suspect internal print head ink cross contamination.
I also have a Canon i850 printer which uses the same print head. I exchanged print heads between the two printers leaving the 4 cartridges with their original printers. The identical problem followed the print head to the i850 printer. To determine whether the rubber print head inlet seals are the possible trouble source I rotated seals C to Y, Y to M and M to C - no change. I noticed no excess ink around the rubber seals when the cartridges were removed. Since the print head is parked on a different purge pad, I discount the purge system as being the source of the cross contamination.
On this string: Chobo 2 , post # 1, pic 3 purge test pattern

On chobo2's problem, I concur with Phipham, post #4
This test pattern resembles mine except the magenta is contaminated with yellow but the yellow is clear. My yellow shows banding after a couple of idle hours. After a few more hours, banding shows up in the magenta as well.

My conclusion is a faulty print head. I don't intend to disassemble it so the best fix is a new Canon QY6-0064 print head.
.
My Canon i560, when printing a 4 color purge pattern, displays a banding pattern in the yellow and magenta color bars. Two normal cleaning cycles clean it up but the problem returns overnight. I suspect internal print head ink cross contamination.
I also have a Canon i850 printer which uses the same print head. I exchanged print heads between the two printers leaving the 4 cartridges with their original printers. The identical problem followed the print head to the i850 printer. To determine whether the rubber print head inlet seals are the possible trouble source I rotated seals C to Y, Y to M and M to C - no change. I noticed no excess ink around the rubber seals when the cartridges were removed. Since the print head is parked on a different purge pad, I discount the purge system as being the source of the cross contamination.
On this string: Chobo 2 , post # 1, pic 3 purge test pattern
On chobo2's problem, I concur with Phipham, post #4
This test pattern resembles mine except the magenta is contaminated with yellow but the yellow is clear. My yellow shows banding after a couple of idle hours. After a few more hours, banding shows up in the magenta as well.
My conclusion is a faulty print head. I don't intend to disassemble it so the best fix is a new Canon QY6-0064 print head.
.
Trigger 37
Printer Guru
- Joined
- Dec 23, 2006
- Messages
- 607
- Reaction score
- 4
- Points
- 136
Emerald,... I think you are wrong. I don't see any result of cross contamination, especially since your yellow and Cyan are pure colors. If you had corss contamination, between any two colors, you would see the results in both. The banding you see is nothing more than some clogged nozzle in that section of the color printhead. Have your ever done an external cleaning of the head. Also, I think your Magenta ink cart and/or head is clogged. The mostly brown color you see in your test pattern is the result of some good yellow and insufficient Magenta.
What you need to do is first print a nozzle test pattern and post that. Then remove the head and clean it in the laundry room sink. Use the highest force warm-to- Hot water focused on the input ports and then turn the head over and focus the stream on the nozzle patterns. After awhile turn the head back over without getting any water in the top where the filter screens are located. Examine each screen to see if they are WET with colored ink. This is a sign that the water is gettin back through the nozzzles up to the filter ports. Turn it back over and continue cleaning until you don't see anymore colored ink.
Now dry the printhead with 60 pSI compressed air. If you don't have a compressor, use a hair dryer set on max air and min heat. You have to get all water dry anywhere on the head before you put it back in the machine. You may have to leave it set over night.
Check the ink flow of each ink cart by holding it over a 1/4 fold paper towel. If you blot the ink cart to the towel you should get easy indication of wet ink. If you don't, then blow air (with your lips) into the top rear of the ink cart where the air intake port is locate. You should easily get a drop of ink to fall onto the paper towel. Reinstall the printhead and all the GOOD ink carts and do only a "Cleaning Cycle: from the maintenance panel. This will re-"Prime" the printhead with good ink. Now print only a nozzle check pattern and post the result here.
emerald
Getting Fingers Dirty
Trigger: I hope you're right - that I have a clog in the magenta cartridge or magenta print head nozzle. I can probably fix that.
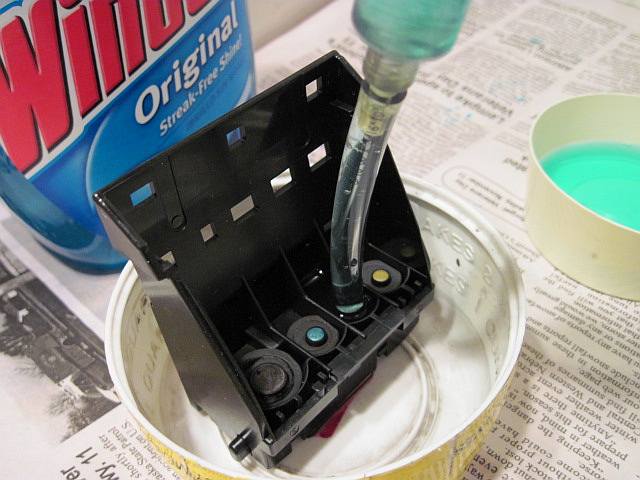
Here's what I've done: To avoid immersing the print head in water, I put a snug-fitting clear plastic tube over the print head inlet after removing the rubber gasket. Using a 10ML syringe that fit snugly into the tube, I slowly injected Windex into/through the print head forcing the ink out into a shallow container. When it flowed clear, I placed the print head on a four layer fold of paper towel and filled the plastic tube with Windex. It wicked into the paper towel in less than 2 minutes. I filled the tube 3 times and it flowed freely while I waited. I did this to the yellow and magenta inlets only because the black and cyan seemed to be OK. I removed the rubber gaskets around the color inlets and examined them under a magnifying glass. They are pliable and appear smooth with no cracks or distortions. I shifted them one color position when I re-installed them.
The cartridges were already fitted with silicone rubber plugs. I flushed the BCI-3 yellow and magenta cartridges with hot water using a 16 oz. squeeze bottle with a tapered nozzle. I blew the cartridges as dry as I could by mouth. I then filled them with fresh Hobbicolor ink. Before putting them in the printer, at your suggestion, a gentle puff over the vent hole ejected a couple of large drops into the sink.
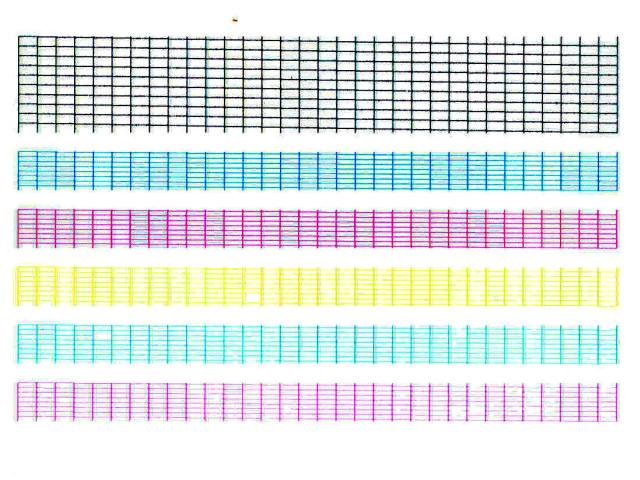
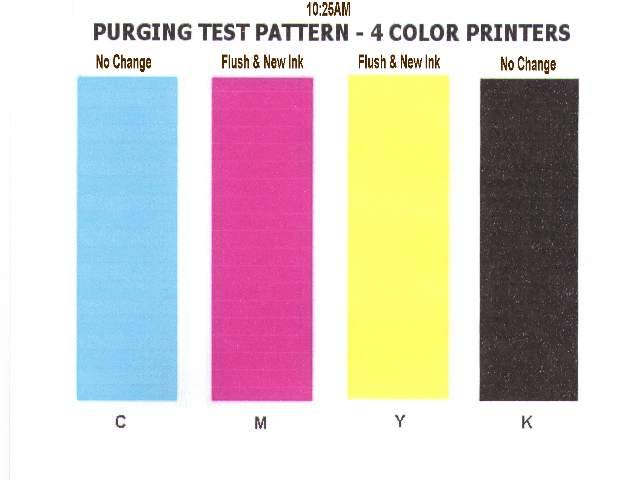
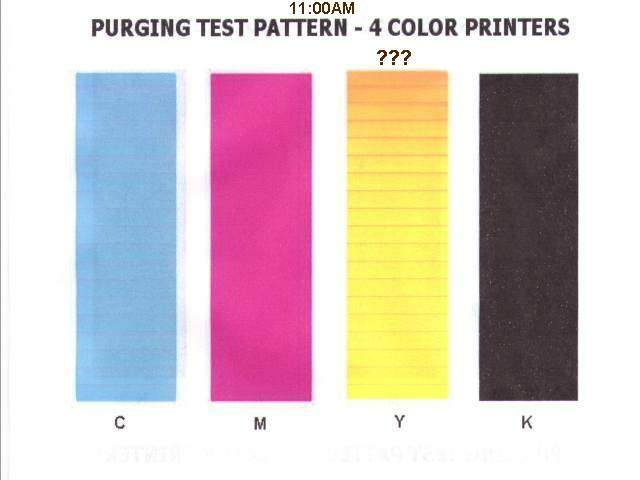
I installed the print head and cartridges in the Canon i850 printer and then did one deep cleaning and a couple of regular cleanings of both black and color. I did a nozzle check. I printed a four color bar chart using plain paper and standard quality preference settings. The first bar chart printing was at 10:25 AM, the second bar chart a half hour later.
The accompanying graphics show my print head cleaning method and the nozzle check. The first color bar is OK, the second has banding in the yellow. I scanned the nozzle check at 400 DPI, cropped the image and enhanced the colors. The yellow is not as clear as it should be but there doesn't appear to be any yellow nozzles missing. After a cleaning and a good bar chart print out, the second bar chart print out a half hour later shows the yellow starts with an orange hue which progressively diminishes to just banding stripes and then is almost clear yellow at the end. Three hours later I did the same color bar print out. The yellow bar was a solid orange at the top diminishing to shades of yellow interspersed with orange lines. The cyan was a lavender color. So it seems that within a half hour, without any activity, the yellow and sometimes another color takes on an unwanted hue. The results are the same with a solid yellow purge pattern.
Just for giggles, I put the suspected print head back in its original home, the Canon i560 printer. I installed the original i560 BCI-6 cartridges. After turning it on, the printer went through its thing which I assume to be a cleaning cycle. I then launched a service mode nozzle check. It looked OK. I returned to the normal mode and launched a color bar print out. The color bar looked perfect. After 35 minutes I did a second color bar print out. Now it displays the same orange banding in the yellow bar and this time there are white lines in the cyan bar. The magenta appears normal.
My speculation is that the yellow ink (and possibly others) is being contaminated within the print head by a slow internal bleed from another ink channel. When purged by a cleaning cycle or a four color bar chart print out, the yellow begins to clear up as fresh ink replaces the contaminated ink.


Here's what I've done: To avoid immersing the print head in water, I put a snug-fitting clear plastic tube over the print head inlet after removing the rubber gasket. Using a 10ML syringe that fit snugly into the tube, I slowly injected Windex into/through the print head forcing the ink out into a shallow container. When it flowed clear, I placed the print head on a four layer fold of paper towel and filled the plastic tube with Windex. It wicked into the paper towel in less than 2 minutes. I filled the tube 3 times and it flowed freely while I waited. I did this to the yellow and magenta inlets only because the black and cyan seemed to be OK. I removed the rubber gaskets around the color inlets and examined them under a magnifying glass. They are pliable and appear smooth with no cracks or distortions. I shifted them one color position when I re-installed them.
The cartridges were already fitted with silicone rubber plugs. I flushed the BCI-3 yellow and magenta cartridges with hot water using a 16 oz. squeeze bottle with a tapered nozzle. I blew the cartridges as dry as I could by mouth. I then filled them with fresh Hobbicolor ink. Before putting them in the printer, at your suggestion, a gentle puff over the vent hole ejected a couple of large drops into the sink.
I installed the print head and cartridges in the Canon i850 printer and then did one deep cleaning and a couple of regular cleanings of both black and color. I did a nozzle check. I printed a four color bar chart using plain paper and standard quality preference settings. The first bar chart printing was at 10:25 AM, the second bar chart a half hour later.
The accompanying graphics show my print head cleaning method and the nozzle check. The first color bar is OK, the second has banding in the yellow. I scanned the nozzle check at 400 DPI, cropped the image and enhanced the colors. The yellow is not as clear as it should be but there doesn't appear to be any yellow nozzles missing. After a cleaning and a good bar chart print out, the second bar chart print out a half hour later shows the yellow starts with an orange hue which progressively diminishes to just banding stripes and then is almost clear yellow at the end. Three hours later I did the same color bar print out. The yellow bar was a solid orange at the top diminishing to shades of yellow interspersed with orange lines. The cyan was a lavender color. So it seems that within a half hour, without any activity, the yellow and sometimes another color takes on an unwanted hue. The results are the same with a solid yellow purge pattern.
Just for giggles, I put the suspected print head back in its original home, the Canon i560 printer. I installed the original i560 BCI-6 cartridges. After turning it on, the printer went through its thing which I assume to be a cleaning cycle. I then launched a service mode nozzle check. It looked OK. I returned to the normal mode and launched a color bar print out. The color bar looked perfect. After 35 minutes I did a second color bar print out. Now it displays the same orange banding in the yellow bar and this time there are white lines in the cyan bar. The magenta appears normal.
My speculation is that the yellow ink (and possibly others) is being contaminated within the print head by a slow internal bleed from another ink channel. When purged by a cleaning cycle or a four color bar chart print out, the yellow begins to clear up as fresh ink replaces the contaminated ink.
- Joined
- May 29, 2007
- Messages
- 3,031
- Reaction score
- 1,773
- Points
- 333
- Location
- Ghent, Belgium
- Printer Model
- SC-900 ET-8550 WF-7840 TS705
Another cause could be the purging/parking pads where the printhead is parked on when you turn of the printer. If the ink is not efficiently sucked away during purging cycles, the ink can crawl its way back through the other nozzle banks and maybe this is causing the problems you are encountering.
emerald
Getting Fingers Dirty
Canon i560 print head
This post describes and illustrates a method I used to fix a suspected slow internal leak in a Canon i560 print head. See post #25 and #27, this string.
Update: 3/14/2010 See post #44, this thread.
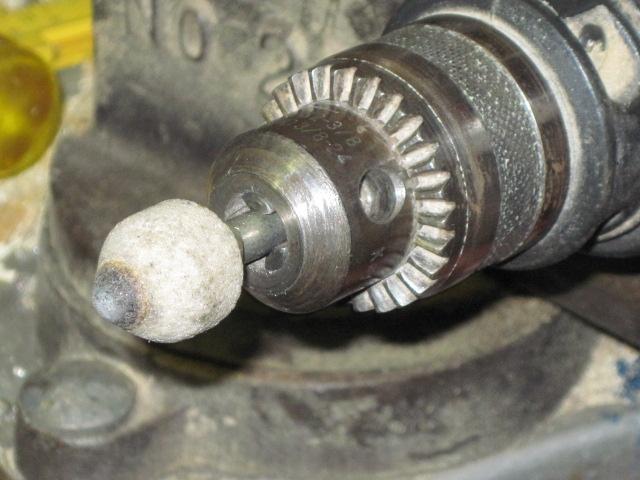
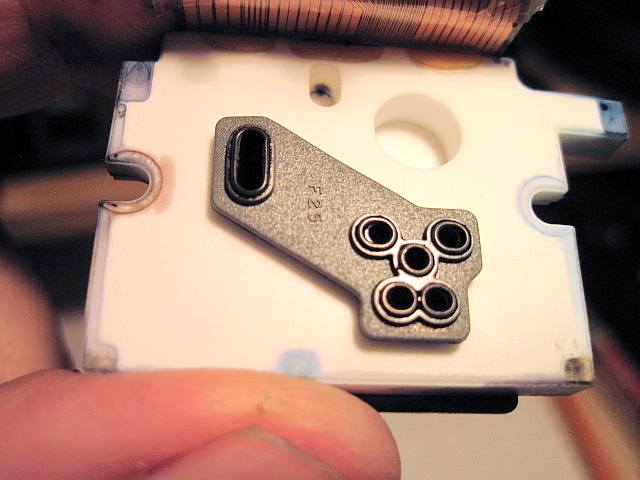
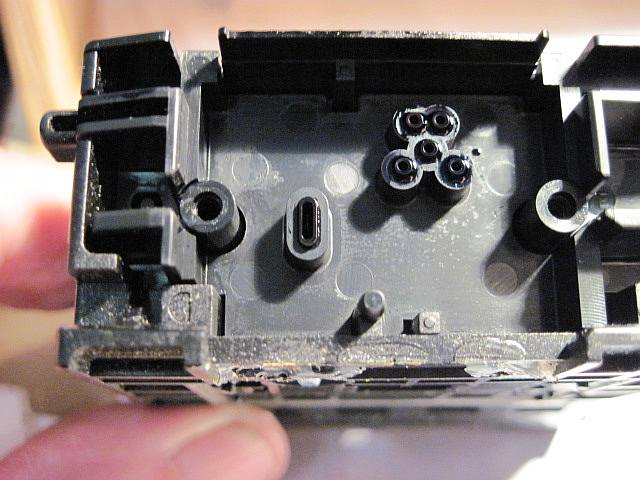
The PC board is fastened to the print head body by four plastic tabs at each corner. I removed them using a tapered grind stone about an inch in diameter. I acquired it many years ago and don't remember its purpose. It has a 1/4" shaft that can be inserted into a 1/4" or 3/8" drill chuck. I clamped the electric drill in a vice and set the locking switch to on. I carefully pressed the print head tabs against the point of the spinning grind stone and ground them away.
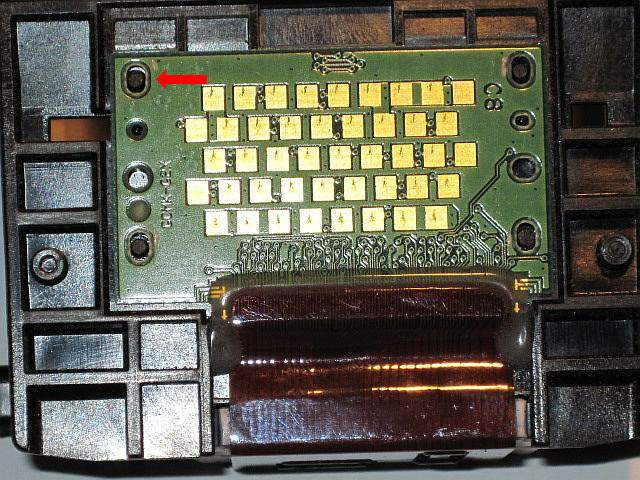
I removed the two screws holding the ceramic part of the print head to the plastic body. One of the Phillips screw head slots was buggered. To remove it, I had to exert a lot of pressure to keep the screw from slipping under the Phillips screwdriver. I used an Exacto knife to cut through the outside edges of the silicone rubber sealing the ribbon conductor. I gently pried the ceramic and aluminum wafer that houses the nozzles away from the plastic body of the print head. A rubber type gasket was exposed.
A close examination with a magnifying glass of the gasket and the two mating surfaces detected no damage or any sign of leakage between the color channels. I washed the gasket in hot water and examined it again. The gasket was very smooth and pliable. I then flushed the ceramic and aluminum wafer in both directions under a stream of hot water. I flushed the plastic housing inlets and channel openings that mate with the gasket in both directions also. I dried the loose PC board with a hair dryer. I then re-assembled the print head taking special care to tighten the two Phillips screws evenly. I smeared a small dab of epoxy (JB Weld) over the four tabs to secure the PC board to the print head body.
I installed the print head and cartridges into the original i560 printer and turned it on. The printer did its thing and stabilized. I launched a four color bar chart test. It looked OK. I waited a half hour and did the same thing. It looked OK too! This was the point where the trouble with discolored yellow appeared before. I waited an hour, same test. Still no trouble. The next morning I launched the four color bar chart test again. No trouble. I've printed out a few test charts, photos and some everyday bulletins of interest. No trouble so far.
I wish to acknowledge:
headphonesman, post #7 and #9 http://www.nifty-stuff.com/forum/viewtopic.php?id=1544&p=1
phipham, post # 4, this string
trigger 37, post #26, this string


This post describes and illustrates a method I used to fix a suspected slow internal leak in a Canon i560 print head. See post #25 and #27, this string.
Update: 3/14/2010 See post #44, this thread.
The PC board is fastened to the print head body by four plastic tabs at each corner. I removed them using a tapered grind stone about an inch in diameter. I acquired it many years ago and don't remember its purpose. It has a 1/4" shaft that can be inserted into a 1/4" or 3/8" drill chuck. I clamped the electric drill in a vice and set the locking switch to on. I carefully pressed the print head tabs against the point of the spinning grind stone and ground them away.
I removed the two screws holding the ceramic part of the print head to the plastic body. One of the Phillips screw head slots was buggered. To remove it, I had to exert a lot of pressure to keep the screw from slipping under the Phillips screwdriver. I used an Exacto knife to cut through the outside edges of the silicone rubber sealing the ribbon conductor. I gently pried the ceramic and aluminum wafer that houses the nozzles away from the plastic body of the print head. A rubber type gasket was exposed.
A close examination with a magnifying glass of the gasket and the two mating surfaces detected no damage or any sign of leakage between the color channels. I washed the gasket in hot water and examined it again. The gasket was very smooth and pliable. I then flushed the ceramic and aluminum wafer in both directions under a stream of hot water. I flushed the plastic housing inlets and channel openings that mate with the gasket in both directions also. I dried the loose PC board with a hair dryer. I then re-assembled the print head taking special care to tighten the two Phillips screws evenly. I smeared a small dab of epoxy (JB Weld) over the four tabs to secure the PC board to the print head body.
I installed the print head and cartridges into the original i560 printer and turned it on. The printer did its thing and stabilized. I launched a four color bar chart test. It looked OK. I waited a half hour and did the same thing. It looked OK too! This was the point where the trouble with discolored yellow appeared before. I waited an hour, same test. Still no trouble. The next morning I launched the four color bar chart test again. No trouble. I've printed out a few test charts, photos and some everyday bulletins of interest. No trouble so far.
I wish to acknowledge:
headphonesman, post #7 and #9 http://www.nifty-stuff.com/forum/viewtopic.php?id=1544&p=1
phipham, post # 4, this string
trigger 37, post #26, this string
Trigger 37
Printer Guru
- Joined
- Dec 23, 2006
- Messages
- 607
- Reaction score
- 4
- Points
- 136
Emerald,... First,..Congratulations on a job well done. You have more guts than most of us. After looking several times, I am beginning to believe that the "Pharmacist" is on the correct track. If you now have totally cleaned the parking pads, I don't think you will see the problem again. Sometimes the color park pad gets so LOADED with one or another color, such as Magenta, that the excesse ink wicks back up into the nozzles of the other colors. In your pictures we see the bar test printing out 4 colors and the yellow starts out with brown and gradually fades to pure yellow. The initial brown color is just the mixture of yellow and magenta ink only in very small amount. As soon as that small about is expelled onto paper the color return to yellow. In other words, as soon as the old "Wicked" ink is used up and NEW ink flows, the color become pure. If you really had any cross contamination in the head, the color would be bad and would get worse the more you printed.
I thank you for all of this documentation as it adds to the final understanding of how things go wrong and can be corrected.
I have done a lot of work with HP ink carts and many attempts to clean them once they get clogged. What I have learned is that resting any bank of printhad nozzles of any color in water or any pool of liquid will RAPIDLY CROSS CONTAMINATE ALL COLOR, ESPECIALLY THE TWO THAT ARE ADJACENT. Once ink "Wicks backward" in any HP head it is very difficult to get it out and can ruin the entire printhead -ink cart combination.
The advantage in Canon units is that the nozzles and the ink cart can be separated and/or replaced one at a time. Not so in HP where the ink cart and the head are combined into one. Working in both technologies has taught me more about each.