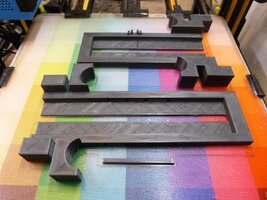
Somebody who can help me to print something in 3D ?

Tony4597

Fan of Printing
Joined
Jan 20, 2021
Messages
91
Reaction score
57
Points
65
Location
Cheshire, UK
Printer Model
Epson Surecolor SC P800
FWIW, and bearing in mind I have not tried a guide such as these.
I believe the Z direction (height) can adversely readings due to the thicker your guide base is the greater the cross-talk from adjacent column patches may be. In practice does it really make any difference I just do not know but...

Quote from Graeme Gill (Developer ArgylCMS)
The Munki/i1Studio isn't designed to be spaced away from the paper - the geometry of the illuminant doesn't allow for that.
So it really should be sliding on the paper itself. A "gotcha" is that the instrument has two small rubber pads that
are designed to stop it slipping when taking individual measurements, and these impede smooth sliding. If
you are mainly doing strip reading you could remove these, or if you leave them they will wear down in time anyway :)[/quote}
 

pharmacist

Printer VIP
Platinum Printer Member
Joined
May 29, 2007
Messages
2,673
Reaction score
1,444
Points
313
Location
Ghent, Belgium
Printer Model
SC-900 ET-8550 WF-7840 TS705
FWIW, and bearing in mind I have not tried a guide such as these.
I believe the Z direction (height) can adversely readings due to the thicker your guide base is the greater the cross-talk from adjacent column patches may be. In practice does it really make any difference I just do not know but...
The latest i1Studio and CCStudio versions generates patches with a white or black separation bar unlike the older versions of Colormunki, where all the patches are connected continously, So I think it should be ok if the distance difference is not too large in Z-direction 5 (3 mm ?)
 

Tony4597

Fan of Printing
Joined
Jan 20, 2021
Messages
91
Reaction score
57
Points
65
Location
Cheshire, UK
Printer Model
Epson Surecolor SC P800
The latest i1Studio and CCStudio versions generates patches with a white or black separation bar unlike the older versions of Colormunki, where all the patches are connected continously, So I think it should be ok if the distance difference is not too large in Z-direction 5 (3 mm ?)
I suspect you may be right here but I have not actually tested. What we need is for someone to cut off the little feet on the unit after first making profiles with a guide system and then direct on to paper after amputation of feet :confused:
then compare numerically and visually.
I take it you are not going to volunteer are you? ;)😁
 

pharmacist

Printer VIP
Platinum Printer Member
Joined
May 29, 2007
Messages
2,673
Reaction score
1,444
Points
313
Location
Ghent, Belgium
Printer Model
SC-900 ET-8550 WF-7840 TS705
I can do a test with the new slightly elevated jig (I am now using a paper/wood jig, so practically flat) and see if there is a difference by scanning with both my older paper/wood jig.
 

Artur5

Printer Master
Joined
Jan 24, 2011
Messages
1,313
Reaction score
1,643
Points
278
Location
Kmt. 0.
Printer Model
MB5150,Pro10s,i3Mk3s+,Voron2.4
I'm in the process of printing your two STL files..

View attachment 16751
Send me a PM if you want details about the assembly, but it's quite straightforward. I used cyanoacrylate and four steel rods of 2mm to join the two parts. Replacing the rods with filament probably would be OK as well.
 

The Hat

Printer VIP
Platinum Printer Member
Joined
Jan 18, 2010
Messages
15,857
Reaction score
8,876
Points
453
Location
Residing in Wicklow Ireland
Printer Model
Canon/3D, CR-10, CR-10S, KP-3
Send me a PM if you want details about the assembly, but it's quite straightforward.
It’s not me that will need assembly instructions, I won’t be using it, I intend sending it to @pharmacist..

But as you say putting it together is straightforward..

munki.jpg

P.S. the finished item looks pretty good.. Thank you..:thumbsup
 

Tony4597

Fan of Printing
Joined
Jan 20, 2021
Messages
91
Reaction score
57
Points
65
Location
Cheshire, UK
Printer Model
Epson Surecolor SC P800
I can do a test with the new slightly elevated jig (I am now using a paper/wood jig, so practically flat) and see if there is a difference by scanning with both my older paper/wood jig.
It was only a tongue in cheek suggestion to ask if you were volunteering to remove the feet and scan directly on print surface. ;) :)
I know you have done a lot of work on this and are obviously happy with your results. If you do decide to experiment it would be interesting to hear your findings. Artur5 print looks very good

There was a time when I considered designing and making a jig that allowed the i1Studio to rest directly on the print and to have a method to temporarily align the unit with the row of patches; perhaps a flip out alignment tool? Decided that it would probably be a PITA to scan each row this way and dropped the idea as I got the chance to buy an i1Pro2.
 

pharmacist

Printer VIP
Platinum Printer Member
Joined
May 29, 2007
Messages
2,673
Reaction score
1,444
Points
313
Location
Ghent, Belgium
Printer Model
SC-900 ET-8550 WF-7840 TS705
It was only a tongue in cheek suggestion to ask if you were volunteering to remove the feet and scan directly on print surface. ;) :)
I know you have done a lot of work on this and are obviously happy with your results. If you do decide to experiment it would be interesting to hear your findings. Artur5 print looks very good

There was a time when I considered designing and making a jig that allowed the i1Studio to rest directly on the print and to have a method to temporarily align the unit with the row of patches; perhaps a flip out alignment tool? Decided that it would probably be a PITA to scan each row this way and dropped the idea as I got the chance to buy an i1Pro2.
Asking myself if you will have that essential license for printer profiling for the i1Pro2....the license costs as much as a device itself without license....fortunately ArgyllCMS is a good (albeit a bit cryptic) software alternative to unleash the power of your i1Pro2. I have produced a few patch targets that are optimized for A4 (648, 750, 875 and 924 patches on a single sheet of A4) and also smaller targets for 10x15 and 13x18 cm photo cards. I have stretched and benched the patch layout so the printed target can be perfectly scanned from left to right and vice-versa in the most ergonomical way.
 
Top