More on The Canon Optical Sensor

Tigerman

Printer Master
Platinum Printer Member
Joined
Jan 6, 2011
Messages
232
Reaction score
130
Points
207
Location
Jordan
Printer Model
Canon MG5640, iX6840
:barnieI am not know if above posts mean all canon cartridges, the optical sensor exist in all models like I have and with same functionality?? ?
 

mikling

Printer VIP
Platinum Printer Member
Joined
Jul 2, 2006
Messages
3,239
Reaction score
1,472
Points
313
Location
Toronto, Canada
:barnieI am not know if above posts mean all canon cartridges, the optical sensor exist in all models like I have and with same functionality?? ?

To determine how the sensor works in all models is a Huuge task. So far I have only been looking closely at the CLI-8/PGI-5. The levels at which certain things happen appear to be different depending on the generation of printer. Like Hat has stated, all these tests has some level of risk.
What is known is that if you do things properly and reset the chip, it will work as per standard expectations. So as long as the cartridge has ink levels at full when the chip is reset, it will work as per normal. What will confuse some folks is that it is recommended that we always have ink in the reservoir at all times. That means that the cart needs to be topped off before empty and if an external resetter is not available, the coordination is lost until the chip is reset and topped off again.

So for those who use ARC chips, the carts need to be topped off at the low point and topped up again when the chip is reset for best results.
 

palombian

Printer Master
Joined
Feb 4, 2014
Messages
1,906
Reaction score
2,288
Points
297
Location
Belgium
Printer Model
PRO10,PRO9500II,MB5150,MG8250
Since a refiller does not lose the ink left in the cartridge, he will be inclined to top off too early (altough - on a 526 - this is just over half the capacity when the yellow warning shows up :().
IMO being limited to the range of the reservoir is a small price to make it work forever.
 

Grazer5

Fan of Printing
Joined
Sep 22, 2014
Messages
63
Reaction score
29
Points
58
Location
Winnipeg, Canada
Printer Model
Pro-100, Ricoh Pro 7100S
Actually Mike, we've been running into this problem with our fleet of Pro-100's since we started to refill the tanks before they were dry. I use a Redsetter BTW. What's better is just to visually check each tank and change them out before empty if possible, then reset and fill to the top. We've dramatically reduced our fried head collection since adopting this protocol. once in a while I have to pull a head and then with some of Pharmacists solution, gently pressure clean each colour channel on the head. I use a big syringe with the tip cut to fit snug over the ports. Works great!
 

mikling

Printer VIP
Platinum Printer Member
Joined
Jul 2, 2006
Messages
3,239
Reaction score
1,472
Points
313
Location
Toronto, Canada
Actually Mike, we've been running into this problem with our fleet of Pro-100's since we started to refill the tanks before they were dry. I use a Redsetter BTW. What's better is just to visually check each tank and change them out before empty if possible, then reset and fill to the top. We've dramatically reduced our fried head collection since adopting this protocol. once in a while I have to pull a head and then with some of Pharmacists solution, gently pressure clean each colour channel on the head. I use a big syringe with the tip cut to fit snug over the ports. Works great!

One thing is to weigh the empty cart and the cart when refilled and check if the cart has enough ink.

A fresh OEM cart is approximately 26.75 grams. The empty OEM cart is approximately 13.6 grams. The ink inside the OEM cart is 13.2 grams. For a production scenario, a final weigh is something that should be considered to ensure proper fill.

If you use compatibles it is important to weigh the empty dry compatible and make sure that it is refilled with at least 13.2 grams of ink if you want the sensor to have a chance to work properly. Remember that over time the useable cartridge capacity will drop over a series of refills. If the useable capacity drops by more than the window of allowance, the sensor will not work properly.

Here's the issue with compatibles, the amount of ink left inside the sponge at which point it will not print properly will differ. One thing to keep in mind is that the compatibles do not have a dual layer sponge. The upper sponge in the OEM readily gives up ink due to its less dense nature. Of the 13.2 grams of ink, more is actually used before it runs dry. The compatible does not have the dual layer. This I suspect will allow more ink to held inside the sponge at the upper level. This may have a part to play in that the reservoir empties outside the window and the useable ink in the cart is reduced....thereby a greater risk of running dry before the sensor kicks in.

Also, there's a reason why the optical sensor is there. Canon knows that there is a variation in the amount ink really used versus what it thinks "should" be used hence the sensor to coordinate. When a compatible is added to the equation, the variation might be greater or less. If that is the case it might be possible that the ink useable in the cart is less than the chip window would allow and you run dry before the sensor kicks in....this then would make the visual comparison to be easily superior in your protocol as you've discovered.

This is a very complicated scenario to understand. One other thing, is that I would if possible try only using OEM carts for the colors that typically run out first as they are the critical point to switching out. It is great to know that the before empty recommendation is a proven strategy to preserve printing performance!
 

mikling

Printer VIP
Platinum Printer Member
Joined
Jul 2, 2006
Messages
3,239
Reaction score
1,472
Points
313
Location
Toronto, Canada
I had exactly this problem when I started refilling my pro 100. Because at that time the resetter was not available and I had to override the Canon detection system. When I eventually got hold a a resetter this set of Carts, always displayed incorrectly.

I wrote many message on this board seeking some sort of guidance, but it seems nobody else had the problem. This was a few years back.

rs
Roy, there is a trick that you can use the overridden chips to advantage. As long as the carts are topped up occasionally the last step before the warning the levels will "stick" there....This is a way to get around resetting unless you go dry in the reservoir. I experimented and proved it three+ times and was the start of understanding/keeping an eye on how the optical system actually works. The last step as it turns looks to be the point of entry of the window. Now what is interesting is that on a normal chip, the chip will continue to empty, regardless of the top up. On the Pro-100 the overridden chips does not go down to empty until transitioning the optical detection. Why???? only Canon knows. Actually redsetter does not know either...so really nobody really knows except Canon.
 

palombian

Printer Master
Joined
Feb 4, 2014
Messages
1,906
Reaction score
2,288
Points
297
Location
Belgium
Printer Model
PRO10,PRO9500II,MB5150,MG8250
One thing is to weigh the empty cart and the cart when refilled and check if the cart has enough ink.

I started refilling with the PGI-9 where weighing is part of the procedure.
Never understood why you shouldn't do this with sponge cartridges.
A cartridge leaking (or even the upper sponge absorbing) ink before the maximum weight is reached is developing a sponge problem.

Maybe Canon added some logic to the Pro-100, but for 525/526 printers topping up after detecting a reservoir empty and before the sponge is empty seems to maintain a correct ink level measurement.

Let's keep fingers crossed.
 

BruceW77

Getting Fingers Dirty
Joined
Jul 5, 2018
Messages
22
Reaction score
3
Points
23
Location
Melbourne, Australia
Printer Model
Canon/Pixma Pro-100S, Pro9000
I have not been able to determine at exactly what point the optical sensor is turned on. It might be 60% or 50% empty.

Mikling, I assume you are using the graphical ink monitor normally associated with the maintenance tab on the printer driver, which also pops up when printing? I have found it to be quite inaccurate when the ink levels are low and as you have also pointed out the graph actually freezes at the level just prior to the Low Ink Warning.

Drjim showed there is a better monitor available if you have installed the printer as a network printer (ie. using the Remote UI). See this post in September 2017: https://www.printerknowledge.com/th...er-ink-monitor-for-pro-100.11903/#post-101894.

I have done a comparison between the 2 ink monitors, for my Pro100S, at low ink levels. While I believe they both rely on the same data, the Remote UI (ie RUI) monitor is better for at least 3 reasons:
- It is bigger and easier to analyse.
- It does not freeze at low levels, like the normal Ink Status Monitor.
- It is more accurate at low ink levels. (I have not tested for high levels)

To open the RUI on a Windows PC, I use this method: Open a File Explorer window and navigate down to and select “Network” on the left panel. On the right panel you should see your printer under the “Printers” group, if it has been installed. Double click on this icon and you will get a request for a User Name and a Password. Use “ADMIN” as the User Name and “canon” as the Password.

I only got asked to login the first time, using this method, so not sure if that is because I have not turned my PC off since the first time I opened the RUI. I did add the RUI as a bookmark on the “bookmarks bar” (I use Chrome) and the again was only asked the first time to login. The Ink Level display on my implementation is slightly different to Drjim, in that mine shows 4 ink tanks on the left and 4 on the right, whereas for Drjim it shows all 8 in one single column. Also, for Drjim there is a noticeable demarcation line in the graph on the top 4 carts, but that may be because those 4 carts are relatively full. My carts were either full or near empty and the ones showing near empty have “feathering” of the graph.

To show the improved graphics at low levels, I temporarily replaced 2 full carts with one empty (Yellow) and one low (Black). The attached file is from a screenshot that I scaled/cropped and added a percentage scale. So it is quite clear that the Yellow shows 5%, Black 10%, Magenta 20% and PC 30%.

Ink Levels using RUI with Grid.jpg


I decided to peek at the scripts to see if they revealed any detail not being displayed.

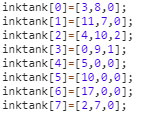
Each cart has 3 numeric parameters that were retrieved. The first parameter seems to be the colour, the second parameter is the ink level, ranging from 0 = full to 10 = Empty. The 3rd parameter has at least 3 values as follows: 0 = “Normal”, 1 = “Low Warning” and 2 = “Empty. I can imagine there are other values assigned that I have not observed, for example they may assign a value for a cart tagged as; “ink monitor disabled”.

See the small cropped screenshot of the parameter values returned: Script.jpg


For the 4 carts shown in the attached file, the parameter for the ink levels were:

Yellow (10) Empty, Black (9) Low, Magenta (8) and PC (7). Because there are 11 values; 0 to 9 can be multiplied by 10 to give percentage ink used. eg. Magenta is 80% used or 20% remaining. The display for carts with low ink warning is now much better, showing 90% used or 10% remaining, which is the same value I get by measuring the weight of ink in carts that have reached this level.

I do have some data for Cyan, PhotoCyan and Magenta which could be compared for the two methods of ink monitoring. Initially I wish to discuss the Magenta. In fact the status of the Magenta cart got me looking at the RUI in the first place, primarily because of this comment in post #7:

This seems to be discordant with what The Hat posted:

My initial thought was that they could be saying the same thing, based on the fact that the normal ink status monitor is so inaccurate at low ink levels. My Magenta at the time was showing 60% empty, using the normal status monitor, which is in the range Mikling has mentioned that he believes is about the level where the optical sensor is enabled. Magenta, Cyan and PC all showed 60% at the time. However, the difference was that the Magenta was clearly lower by visual observation of the ink reservoir.

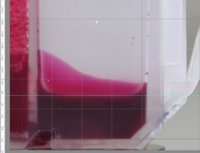
I have attached a photograph of the Magenta cart and superimposed a scale in mm on the left side: Magenta with Grid.jpg

Also attached is a screenshot of the Ink Status Monitor, at that time, with a % scale on the left. Ink Levels - Standard Monitor.jpg

The photograph shows the ink was 7.2mm from the bottom. The screenshot shows the ink level, according to the status monitor, was maybe a tad over 60% empty. The 7.2mm equates to 0.28 inches.

If Mikling was using the normal Ink status monitor, as I have assumed, then because of that monitor’s inaccuracies, the 2 statements do not conflict given that approximate figures only were presented.

When the Magenta was showing as 60% empty in the Ink status monitor it displayed as 70% empty in the RUI monitor and was teetering on the edge of changing to 80% empty, which it did soon after. In addition the weight of the Magenta cart indicates it had 18.98% of ink remaining (or 81.02% empty) (Edit).

The Photo Cyan and Cyan both showed as 70% empty in the RUI monitor. They had 26.8% and 21.9% remaining respectively. They both showed as 60% empty in the normal status monitor.

I am quite sure I have read a post by Mikling suggesting the optical status indicator kick in point may b e when the chip indicates that the ink level has dropped into the last zone prior to ink low warning. I think that is a very strong possibility and would coincide with the ink level parameter mentioned above changing from 7 to 8.

Mikling, is it time you created a YAFLA (Yet Another Five Letter Acronym) for the optical sensor kick in point? Maybe OSKIP.
 
Last edited:

BruceW77

Getting Fingers Dirty
Joined
Jul 5, 2018
Messages
22
Reaction score
3
Points
23
Location
Melbourne, Australia
Printer Model
Canon/Pixma Pro-100S, Pro9000
I can imagine there are other values assigned that I have not observed, for example they may assign a value for a cart tagged as; “ink monitor disabled”.

I did some simulation testing by substituting retrieved values with my own values to see what was displayed. By substituting a “3” for the 3rd parameter, a “?” is displayed to the left of the colour bar. I assume this is what displays if you disable the ink monitor.

Substituting a “4” or higher, into the 3rd parameter, had a rather unusual result in that it extended the colour bar to the left by about 50%. Not sure what that is about.

The Ink Level display on my implementation is slightly different to Drjim, in that mine shows 4 ink tanks on the left and 4 on the right, whereas for Drjim it shows all 8 in one single column.

This seems to be screen width dependant. By narrowing the window width available to the ink monitor, the display changed to show all 8 ink bars in one column.

Also, for Drjim there is a noticeable demarcation line in the graph on the top 4 carts, but that may be because those 4 carts are relatively full. My carts were either full or near empty and the ones showing near empty have “feathering” of the graph.

As part of my simulation I inserted data as if a cart was relatively full, (ie. I changed high numbers to low numbers in the second parameter) but could not see the demarcation line I can see in Drjim’s picture.

I played around with colour values that are not supported by the Pro100S and got the following results:

7 = Black (compared to BK), 12 = R (Red), 15 = CO, 16 = MBK. Values of 18 and above produced a white bar and the word “Undefined”. There were 2 cases which produced multiple colours; 6 = “Color” with a Cyan, Magenta and Yellow band, whereas 8 = “Undefined” with a Cyan, Magenta, Yellow and Black band.

Sorry, it’s a bit off topic, but interesting I thought.
 

BruceW77

Getting Fingers Dirty
Joined
Jul 5, 2018
Messages
22
Reaction score
3
Points
23
Location
Melbourne, Australia
Printer Model
Canon/Pixma Pro-100S, Pro9000
A minor update on the parameter values used in the RUI scripts:
Looking deeper into the script code, it can be seen there are 18 values assigned for the first (Colour) parameter. Some are duplicated (or triplicated), such as Yellow, which can be “4” or “13” and Pbk which can be “1”, “9” or “14”. However, when simulating the three value for Pbk only 14 works, the other 2 result in the word: “Undefined”. The Pro100 uses “4” for Yellow, so I am assuming the value of “13” could be for other model printers.

There are actually 12 values assigned for the second parameter (Ink Level). Previously I only listed 11. The 12th value of “11” is for zero ink and differs from “10” in that it is completely blank or empty whereas “10” is for when the cart is first reported as empty and the bar graph shows 5% remaining, like in the previously posted screenshot for Yellow. So “10” actually coincides with the red “X” appearing and you are advised to replace that cart. It would appear “11” is for the case where the “?” appears (blue in white circle) and you have overridden the ink monitor.

There are 4 values assigned to the 3rd parameter, which is as previously reported.

Attached is a screenshot showing all the values assigned, including a variable called “inkSYM”, which is just the abbreviated code (label) used for each colour. eg. MES0046 points the character ‘M’ for Magenta.

Script2.jpg
 
Top