Canon Pixma MP620 PG nozzles

stratman

Printer VIP
Platinum Printer Member
Joined
Apr 19, 2007
Messages
8,706
Reaction score
7,170
Points
393
Location
USA
Printer Model
Canon MB5120, Pencil
Since you did have an improvement, try soaking again and keep is simple.

I would soak the print head in a non-reactive bowl of Fairy and water. Nothing else. Wadded up paper towels underneath the print head to occasionally use a plunger-like action on the bottom or the print head to push and pull liquid through the nozzles. No syringes, tubing or columns of solution. Let the soaking go on for at least 24 hours. Change the solution when it becomes discolored or after 12 hours or so - whatever is to your liking. You can GENTLY warm the solution in the microwave but NOT the print head. Do not use hot tap water as sediments may be in the water from sitting in the hot water tank. Also, hot water may cook ink or plastics. If your tap water is hard then consider demineralized water from the store.

If after 24 hours there is improvement but not complete then either return to fresh soaking solution or run a cleaning or two. Nothing but nozzle checks for now and post them to let us see your hopeful progress.

Patience may be your best ally.
 

stratman

Printer VIP
Platinum Printer Member
Joined
Apr 19, 2007
Messages
8,706
Reaction score
7,170
Points
393
Location
USA
Printer Model
Canon MB5120, Pencil
Could there be a problem with PG ink clogging the cleaning station?
Check it out. Do you see thick coatings of ink on the wiper blades, parking station and environs? ]

You could test the purge pads by flooding the purge pads with water, alcohol or window cleaner such that pools and remains on top. Then close the lid, let the printer do its automatic maintenance routine. Some recommend running a cleaning cycle. Then lift the lid and see if the solution is gone from the purge pads once the print head moves to the center. If the fluid is gone then the pads and purge mechanism is probably working.
 

stratman

Printer VIP
Platinum Printer Member
Joined
Apr 19, 2007
Messages
8,706
Reaction score
7,170
Points
393
Location
USA
Printer Model
Canon MB5120, Pencil
One further point the last refill was from a New bottle of ink, should I have shaken it before use?.
Brand and seller of the ink? How old is the ink? "New" could mean never opened but 2 years on the shelf.

Shaking? It isn't something I regularly do with the Precision Colors pigment ink for my Canon MP830. I suppose it wouldn't hurt as long as there is not so much air in the solution to cause an air clog in the nozzle channels or not enough liquid ink per nozzle ejection to burn out nozzles. Haven't heard of this, so, doubt it would happen with less than insane amounts of shaking.
 

barfl2

Print Addict
Joined
Feb 22, 2010
Messages
481
Reaction score
65
Points
168
Location
Hampshire U.K.
Since you did have an improvement, try soaking again and keep is simple.

I would soak the print head in a non-reactive bowl of Fairy and water. Nothing else. Wadded up paper towels underneath the print head to occasionally use a plunger-like action on the bottom or the print head to push and pull liquid through the nozzles. No syringes, tubing or columns of solution. Let the soaking go on for at least 24 hours. Change the solution when it becomes discolored or after 12 hours or so - whatever is to your liking. You can GENTLY warm the solution in the microwave but NOT the print head. Do not use hot tap water as sediments may be in the water from sitting in the hot water tank. Also, hot water may cook ink or plastics. If your tap water is hard then consider demineralized water from the store.

If after 24 hours there is improvement but not complete then either return to fresh soaking solution or run a cleaning or two. Nothing but nozzle checks for now and post them to let us see your hopeful progress.

Patience may be your best ally.
 

barfl2

Print Addict
Joined
Feb 22, 2010
Messages
481
Reaction score
65
Points
168
Location
Hampshire U.K.
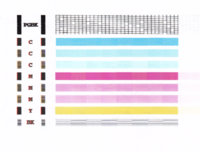
spent all day yesterday using both fairy liquid and Window W5 cleaner and left it soaking alnight in dish of fairy liquid. Dried and topped all carts where a bit low. Result not perfect but much improved. Hopefully the missing segments may recover with use. The black bars on left do not look very sharp. With regard to the Ink it was Octoink and it could be 2years old not kept invoice been in a dark cupboard in a cardboard box. Anyway thanks for your advice. I did try and clean up the parking area which was pretty mucky. Tried flooding the pads but are very difficult to see and access nozzlecheck4.jpg because of the plastic shield.nozzlecheck4.jpg nozzlecheck4.jpg
 

stratman

Printer VIP
Platinum Printer Member
Joined
Apr 19, 2007
Messages
8,706
Reaction score
7,170
Points
393
Location
USA
Printer Model
Canon MB5120, Pencil
Your nozzle check certainly has changed, mostly for the worse. There are vertical train tracks in the PGBK test. There should only be single lines, not double lines. Also, there is ghosting of the letters on the left hand side as well as changes to the vertical black stripes alongside the letters on the left.

Try a print head alignment. Also, make sure the plastic timing strip in the printer is clean.
 

PeterBJ

Printer VIP
Platinum Printer Member
Joined
Nov 27, 2010
Messages
5,119
Reaction score
4,987
Points
373
Location
Copenhagen Denmark
Printer Model
Canon MP990
Could you have printed the nozzle check twice on the same sheet of paper to enhance the contrast?

The dye black looks to me like the print head has been attacked by the "killer fungus". This has happened to me and ruined more than one print head. I have had fungus in regular and photo magenta, regular cyan and photo black.

If you want to start using the new print head, I recommend to discard your photo black ink and cartridges and buy new ink and replacement empty photo black cartridges.

Chlorine bleach might kill the fungus in the cartridges and remove the colour from it, but I think the fungus or dead remnants thereof can block the new print head.
 
Last edited:

barfl2

Print Addict
Joined
Feb 22, 2010
Messages
481
Reaction score
65
Points
168
Location
Hampshire U.K.
Your nozzle check certainly has changed, mostly for the worse. There are vertical train tracks in the PGBK test. There should only be single lines, not double lines. Also, there is ghosting of the letters on the left hand side as well as changes to the vertical black stripes alongside the letters on the left.

Try a print head alignment. Also, make sure the plastic timing strip in the printer is clean.
 

barfl2

Print Addict
Joined
Feb 22, 2010
Messages
481
Reaction score
65
Points
168
Location
Hampshire U.K.
Yes you are right Closer examination of nozzle print show misalignment. Rightly or wrongly I tried the auto head align then a nozzle check first print colours were all grey after 2 cleans colour was back but PG nozzle was back to its old missing segments. I checked timing strip was dirty DISASTER whilst trying to clean it with my dodgy eyesight somehow the tiny tension spring came off. Cannot see it tried a magnetic wand but that did not find it.

Now trying to dismantle M/C thought I had a service Manual but pages and Photos are for a 640 and I cannot find the 2 front screws to get the L/R sides off. Found the rear screws OK. Any ideas anybody?. I have just about had it with this M/C and bought a New Head as well, but was not prepared to risk it until the Printer was working OK in plain paper mode. which it was. I also had a Canon colour test page and it made a good job of that even on plain paper.
 
Top