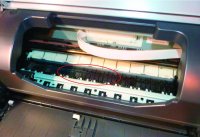
Canon i9550 - streaks on underside of photo.

d87cfv

Getting Fingers Dirty
Joined
May 14, 2006
Messages
34
Reaction score
12
Points
41
Location
UK
Hi Guys,

I'll start by saying I appreciate this is a 10 year old printer model now, but I really hope someone still has knowledge of it. I bought it second hand 3 years ago and it's been an absolute workhorse. Printing easily 100 photo's a week ranging from 4x6 to A3. Sometimes it can run off 100 photo's in a single day though. I have a computer shop doing sales and repairs, also photo printing, either large runs of holiday snaps or one off's from iphones etc also professional photographers prints several times a week.

I used to use OCP inks and refill myself (from my days running a Cartridge World franchise) but when printing for photographers they were very picky over colour casts/balance etc so find it easier these days to stick with Genuine carts.

Anyway, to my problem:
Whenever I print, I always get black streaks on the underside of the photo, it's an irritation more than anything, but I'm selling this print service so ideally would like to know how to clean the bottom plate and rollers somehow.

Do I need to completely disassemble the printer? Why after thousands of prints is this ink still there, where is it coming from?

The other problem, more of an issue is that on A4 or A3 paper I have to set "Avoid Paper Abrasion" to lift the printhead slightly or I get scuffs on the leading and trailing edge of the paper. More noticable on the A4 and A3 paper because I use a thicker paper 250gsm and 280gsm.

Your thoughts on these two probs would be appreciated.

Dan
 

The Hat

Printer VIP
Platinum Printer Member
Joined
Jan 18, 2010
Messages
15,827
Reaction score
8,858
Points
453
Location
Residing in Wicklow Ireland
Printer Model
Canon/3D, CR-10, CR-10S, KP-3
Hi Dan, No you printer is not that old, in fact I am on my second one, and still reckon it’s a marvellous printer.

Now your problem is probably cause by one of two things, 1] if your printing borderless the access ink has to go somewhere and so it ends up soaking the little sponge in the platen area. (See Pic)

Platten.jpg click to enlarge..

This little sponge can be removed easily with a screw driver and washed in soapy water, then dried by pressing between a couple of sheets of newspaper, it only goes back one way, so note which in left and right, it’s pushed back into position using the screw driver again.

2] The purge unit and wiper blade probably need a good cleaning also and so will the bottom of your print head, to clean the purge unit and the platen area on your printer it is necessary to power on the machine and raise the top cover then pull the power plug when the cartridges moves to the centre.

You now have easy access to the purge unit area so using any sort of window cleaner, (Lidl W5) spray the whole area in and around the two ceramic plates that you can see and use some paper towels to mop the whole thing up, if necessary do it more than once to do a cleaner job.

Purge Area.jpg Click to enlarge...

Next turn to the print head and remove all of the cartridges and then the print head itself, using the same clean paper towels, soak them in window cleaner and gently wipe away all of the ink that is on the bottom plate, once you’ve done that put the head back in and install all the cartridges.

Just before powering on again pour some window cleaner onto the ceramic purge pads, create a puddle on both of them, then checking there is noting in the way of the print carriage, power on the printer again.

It wouldn’t be a bad idea to run a print head alignment test before commencing photo printing again , it’s just to make sure that all the nozzles back in alignment once more..
 

PeterBJ

Printer VIP
Platinum Printer Member
Joined
Nov 27, 2010
Messages
5,119
Reaction score
4,987
Points
373
Location
Copenhagen Denmark
Printer Model
Canon MP990
The service manual and parts cartalog might be helpful in case you want to take the printer apart for cleaning. Links for the manuals are found in this post. I just checked the links, and they still work.

You also find a good instruction for disassembling the Canon S- and I- series printers, including i9950, at druckerchannel.de, in German here or in English here.
 

The Hat

Printer VIP
Platinum Printer Member
Joined
Jan 18, 2010
Messages
15,827
Reaction score
8,858
Points
453
Location
Residing in Wicklow Ireland
Printer Model
Canon/3D, CR-10, CR-10S, KP-3
To do the little bit of maintenance that I suggested above, there should be no need to remove any of the covers at all, once you have the print head out of the way then there is enough room to work on the purge pads..
 

d87cfv

Getting Fingers Dirty
Joined
May 14, 2006
Messages
34
Reaction score
12
Points
41
Location
UK
Wow, thanks. So much great info there.

I have had the i9950 apart before (ref age, it was introduced in 2006 according to the internets?) so feel confident I could clean up the purge area without too much drama. But may give it a go on the fly just through the access door. I didn't know the sponge pad just pulled out, I'll take a look at that tomorrow.

The majority of my prints are borderless so I imagine a lot of ink is being dumped.
 

d87cfv

Getting Fingers Dirty
Joined
May 14, 2006
Messages
34
Reaction score
12
Points
41
Location
UK
Just like to say thanks again to The Hat!

I cleaned my i9950 inc the bottom sponge and no more marks under the paper. I may even hold off on purchasing a new printer now until a good deal comes up on the Pro-1.
 

palombian

Printer Master
Joined
Feb 4, 2014
Messages
1,885
Reaction score
2,263
Points
297
Location
Belgium
Printer Model
PRO10,PRO9500II,MB5150,MG8250
I had the same with my old MX7600 (reason why I arrived on this forum :D).
As The Hat explained clearly, it is caused by the printhead dripping ink (from a soaked purge unit and wiper) on the rolls (through a soaked platen sponge).

Glad your printer is as new !
 
Top