Calibrating Pro 10s to monitor

Fish323

Getting Fingers Dirty
Joined
Apr 24, 2021
Messages
40
Reaction score
23
Points
33
Printer Model
Epson 1290 Canon Pro 10s
I used a SpyderX Pro to calibrate the monitor on my Dell laptop and I am very happy with the colour renditation on the monitor. However, when I compare the test print to this: https://www.redcliffeprint.co.uk/news/calibration-print.html the test print is far too warm. I don't have a Monkey so this will have to be done by eye. Is it possible to calibrate the printer to the monitor? Any help greatly appreciated. Many thanks.
BTW I am using Octoinks.
 

Ink stained Fingers

Printer VIP
Platinum Printer Member
Joined
Dec 27, 2014
Messages
6,016
Reaction score
7,159
Points
363
Location
Germany
Printer Model
L805, WF2010, ET8550
I'm not supporting the approach to calibrite a printer to match the monitor output; printer and monitor are both
output devices separate of each other - and should be calibrated/profiled separately . But it is possible as an interim step to use the color adjustment options in the driver to get the printer to a status somewhat matching the display colors. Printer profiling should get as much investment as monitor calibration. One of the difficulties are the different gamuts which printer and monitor support.
 

Fish323

Getting Fingers Dirty
Joined
Apr 24, 2021
Messages
40
Reaction score
23
Points
33
Printer Model
Epson 1290 Canon Pro 10s
Thank you for that. I see what you mean by somewhat. It isn't exactly scientifically based, more bodged. As I adjust the colours nothing shows me the effect this is likely to have on the output.
Can someone plese post a link to show me how to calibrate the printer they proper way, in a simple step by step guide so my daughter could do it. No matter how simple it is, I won't be able to do it
 

Ink stained Fingers

Printer VIP
Platinum Printer Member
Joined
Dec 27, 2014
Messages
6,016
Reaction score
7,159
Points
363
Location
Germany
Printer Model
L805, WF2010, ET8550
As I adjust the colours nothing shows me the effect this is likely to have on the output.
That's the easy part - you adjust the settings in the driver - and do a printout of a test image - the output
of those color changes become visible in the printout. And if you yet don't like the printout - too blue or red or dark .... you change the settings and do another printout again and you take the printout and compare it with the screen image.
 

Fish323

Getting Fingers Dirty
Joined
Apr 24, 2021
Messages
40
Reaction score
23
Points
33
Printer Model
Epson 1290 Canon Pro 10s
This could take forever with the trial and error. I know it is too warm, but how will I have any idea of how much to push and which sliders to push? It is going to be random guess work. With most photos I am not that fussy, but one in particular is really winding me up. I will give it a go.
 

PeterBJ

Printer VIP
Platinum Printer Member
Joined
Nov 27, 2010
Messages
5,103
Reaction score
4,959
Points
373
Location
Copenhagen Denmark
Printer Model
Canon MP990
This is really counter intuitive. It seems the most neutral one is R10. Does this mean I add 10 on the red? Will that not increase the warmth?
Yes that is what to do if the R10 image appears most neutral. You are right that adding more red to the image will make the colour tone more warm.

I just made a test with my MP990 that uses cartridges refilled with the ink set for PGI-x25/CLI-x26 inks. I think this ink set works well with many Canon printers for home use of different cartridge generations and it also works well with HP printers for home use. I use bargain photo paper of brands Sihl and NetBit that were sold by Aldi and Lidl supermarkets in Denmark.

If I print the test image with no corrections applied the print has a green cast meaning magenta should be added. But the viewing conditions affects the perceived colour cast very much. Viewed under an old 60W incandescent bulb and a LED bulb with a 2700K colour temperature the most neutral image is M 10. One 3000K LED bulb shows M 15 as the neutral image and another 3000K LED bulb shows M 20 as the neutral image. A 4000K LED bulb shows M 25 as the neutral image.

In daylight at 10 AM in Copenhagen, overcast which probably equals a colour temperature of 6500 K the test print appears neutral with no corrections applied?? This is also counter intuitive, but I think the reason could be metamerism which the magenta inks both Canon OEM and aftermarket are claimed to suffer from. Another cause could be that the LED bulbs do not have perfect continuous spectra, but might have gaps in some colours. Ordinary LED bulbs for home use seldom have Ra or CRI values better than 80.

Professionally special daylight sources with a Ra/CRI value close to 100 in a neutral grey viewing box are used to compare colours.

Maybe it is your test image that is the problem? maybe you will get another result with another test image?

I'm no expert in this. Maybe one of the experts might have better explanations?
 
Last edited:

PeterBJ

Printer VIP
Platinum Printer Member
Joined
Nov 27, 2010
Messages
5,103
Reaction score
4,959
Points
373
Location
Copenhagen Denmark
Printer Model
Canon MP990
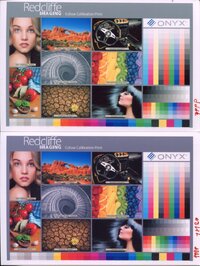
I downloaded OP's test image and printed it with the same settings as the "Girl" test image meaning no corrections applied. I was surprised to see that the print was almost perfect with almost no green cast. Applying a +M 20 correction as the "Girl" test image suggests results in a print with a too reddish and too dark skin tone.
So the two test images give different results. Now I don't know which test image to trust.

Here is a scan of the two prints. Top is no correction and bottom is + M20, click to enlarge:

Redcliffe test1.jpg

Test images can sometimes cause a lot of confusion and problems. See this thread.
 
Top