New Light Standard Design... I hope...

The Hat

Printer VIP
Platinum Printer Member
Joined
Jan 18, 2010
Messages
15,791
Reaction score
8,824
Points
453
Location
Residing in Wicklow Ireland
Printer Model
Canon/3D, CR-10, CR-10S, KP-3
Update on my lamp standard, just in case you taught I had gone asleep..

I have almost completed printing everything except for the last lantern cover (Crown) and a few rivets to hold on the crowns.

I have also decided to use Perspex in place of glass to try and keep the weight down, I will get a delivery of small sheets of Perspex this week, then figure out the best way of cutting them to size, it’s easy doing one but I’ve got to cut 25 of them. (Practical suggestion welcomed)

Here’s some of the statists on the lamp standard, she will be just over 3 metres high and 1.5 metres wide and have 5 lanterns and weight approx. 30 kgs.

I purchased 33 rolls of black filament so far and will just have enough to complete the project, and it has taken over 1400 hours of printing and still going, I was going to print the glass myself, but that would mean even more print time plus I didn’t want opaque glass in the lanterns.

Before installation I’m going to spray the lamp standard with paint for added UV protection, then wire all the lights in and bolt the main column to the concrete foundation and finally fit the top section and then turn it on.

Will it work, of course it will, but will it stand the testament of time and weather, I hope I wont to here to see it fall…
I’ll take a few photos when it’s complete..
P.S. No metal was used in this construction and no animals harmed..:D
 

Redbrickman

Printer Master
Joined
Dec 27, 2010
Messages
1,130
Reaction score
1,232
Points
293
Location
UK
Printer Model
Brother MFC-L8690-CDW
Some info here
https://www.acplasticsinc.com/informationcenter/r/how-to-cut-thin-plexiglass-by-hand

When I was an apprentice we had to cut perspex sheet for a project. The instructor took a large power hacksaw blade and ground it so it had a "hook" at the end, a bit like the blade below if you can imagine the rectangular bit removed. We then clamped a wooden batten along the cutting line, scored it deeply with the blade and then snapped it along the line.

cutter2.jpg
 

The Hat

Printer VIP
Platinum Printer Member
Joined
Jan 18, 2010
Messages
15,791
Reaction score
8,824
Points
453
Location
Residing in Wicklow Ireland
Printer Model
Canon/3D, CR-10, CR-10S, KP-3
That was my intention, but it’s a frightfully slow auld process.. 50 times…. :eek:
 

The Hat

Printer VIP
Platinum Printer Member
Joined
Jan 18, 2010
Messages
15,791
Reaction score
8,824
Points
453
Location
Residing in Wicklow Ireland
Printer Model
Canon/3D, CR-10, CR-10S, KP-3
Last print Update… :weee :ya

I have finally finished printing the lamp standard, there’s not a single piece left to do, ok it’s in many pieces right now and I’ll have to spray paint it to give it UV protection, then wired it all up and assemble it.

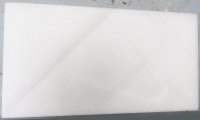
I got the Perspex cut fairly easy with this knife and using the glass template I’d made, I cut all 25 pieces over two days because I didn’t want to chance making any stupit mistake, like cutting a finger off..:eek:

Glass.jpg Knife.jpg click to enlarge..
It’s only a matter of drilling the crown top of the lantern in two places to loosely fit rivets to hold the crowns on, this is to felicitate the fitting of new LED bulbs when that time comes.

I will take a few photos when I got her in position and lighting, if all goes well that is…Fingers crossed… :oops: :D
Did that just take four months.....:eek: :ep
 

The Hat

Printer VIP
Platinum Printer Member
Joined
Jan 18, 2010
Messages
15,791
Reaction score
8,824
Points
453
Location
Residing in Wicklow Ireland
Printer Model
Canon/3D, CR-10, CR-10S, KP-3
Up-date on lighting up time..

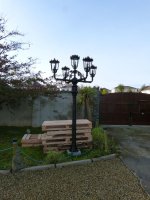
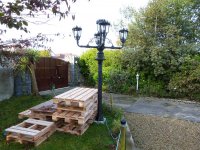
I managed to get quite a few pallets in a neighbouring business park to use as a platform to stand on to get the top half of the lamp standard into place, it may be a light but it Feckin wasn’t.

I went over everything twice to make sure it was safe and secure, but on further examination, I found the centre pole was under a bit of a strain when the wind started blowing. (Wobble) and we get a lot of the stuff here..

What I taught was adequate, turned out not to be so, my calculations for the thickness and strength of the centre pole were not good enough to withstand the weather here, so I reluctantly removed the top half of the lightings segment then removed the centre pole itself, just to see how I could improve the overall strength.

I came up with the idea of placing a scaffolding pole inside the centre section and fill it with concrete, rather than redesigning and reprinting the pole again to make it a bigger diameter and the centre hole smaller with 80% fill instead of the 40% I had used.

When the weather gets better I plan on carrying out the upgrade work to the main upright shaft and then try and sit the lighting section back on top again, I reckon the strengthen centre pole should work much better..

When I get her working again I’ll post a new photo of her in her lighting glory ..
P1010595.jpg P1010593.jpg click to enlarge...
 

Nifty

Printer VIP
Administrator
Joined
Nov 3, 2004
Messages
3,066
Reaction score
1,430
Points
337
Location
Bay Area CA
Printer Model
CR-10, i560 ,MFC-7440N
Man, that's AMAZING!!!!

How many kilo's of plastic are in that thing?
 

stratman

Printer VIP
Platinum Printer Member
Joined
Apr 19, 2007
Messages
8,712
Reaction score
7,176
Points
393
Location
USA
Printer Model
Canon MB5120, Pencil
That is a BEAST of a lamp post! :ep Looks really good, my friend. :thumbsup

I wonder if you need to take into account contraction/expansion of the plastic pole caused by weather/sun? Would be a shame to get a crack in the plastic. :barnie
 

Nifty

Printer VIP
Administrator
Joined
Nov 3, 2004
Messages
3,066
Reaction score
1,430
Points
337
Location
Bay Area CA
Printer Model
CR-10, i560 ,MFC-7440N
I'm also wondering about heat and warping... but I don't remember if he used PLA or not?

Two vids are related:


The Hat

Printer VIP
Platinum Printer Member
Joined
Jan 18, 2010
Messages
15,791
Reaction score
8,824
Points
453
Location
Residing in Wicklow Ireland
Printer Model
Canon/3D, CR-10, CR-10S, KP-3
How many kilo's of plastic are in that thing?
I wonder if you need to take into account contraction/expansion of the plastic pole caused by weather/sun? Would be a shame to get a crack in the plastic.
When I started I just had this idea that it could be done, so I begin designing at the bottom and worked up and grossly underestimated the height and thickness of the centre pole in relation to the width, added weight of the arms, lanterns and glass.

This thing grew out of all portions and showed up my lack of experience in designing something of this size, it ended up 110” H x 62” W and over 65 lb. in weight, and that was after I’d reduced the width and height, it was maybe a mixture of delusion and ignorance on my part. 160cm Width x 280cm Height, and 30kg Weight


But saying all that she’ll look brilliant especially when seeing at dusk, I was worried about the UV exposure and whether to use white or black filament, (Black won out) so when finished for added protection I sprayed it with Baufix black lacquer spray paint.
Capture.JPG
Lidl sells this great quality paint..
During the day the centre shaft will get hot from the sunlight, but I’m banking on it only expanding and when filled with cement that should help disperse some of this heat evenly, but with my track record it may make it worse,(Who knows) and I haven’t got a clue how long it will stay upright… :hu

P.S. The biggest down side of this project is… Now I don’t know what to print, maybe a little bit of maintenance might help take my mind of it.. This project was going day and night for 4 months… :eek:
 
Top