Never ending...

The Hat

Printer VIP
Platinum Printer Member
Joined
Jan 18, 2010
Messages
15,792
Reaction score
8,824
Points
453
Location
Residing in Wicklow Ireland
Printer Model
Canon/3D, CR-10, CR-10S, KP-3
Since getting this 3D printer, it has been going steadily everyday now, my latest project is a covering box lid for my installed PIR.

I needed good strength in this box so I set the printer to high quality and its taking more than 24 hours to print, it has just finished right this minute and it fits like a glove, it was well worth waiting for.
3D at Work.jpg


I still have a long waiting list of different projects that I’ve made up do, my next one is a covering ring for a bearing on Mrs The Hat sewing machine, I’ve had to installed a new drive belt on the sewing machine and it’s a bit slag so this ring will put more tension back on the belt...
Capture.PNG
 

mikling

Printer VIP
Platinum Printer Member
Joined
Jul 2, 2006
Messages
3,239
Reaction score
1,472
Points
313
Location
Toronto, Canada
Since getting this 3D printer, it has been going steadily everyday now, my latest project is a covering box lid for my installed PIR.

I needed good strength in this box so I set the printer to high quality and its taking more than 24 hours to print, it has just finished right this minute and it fits like a glove, it was well worth waiting for.
View attachment 5774

I still have a long waiting list of different projects that I’ve made up do, my next one is a covering ring for a bearing on Mrs The Hat sewing machine, I’ve had to installed a new drive belt on the sewing machine and it’s a bit slag so this ring will put more tension back on the belt...
View attachment 5775

What I need are instructions on tuning up a sewing machine. I repaired a serger once but it took a loooong time to figure it out. Kudos to the inventors of these machines.

When you're done, how about making aftermarket shoes for PGI-9 carts. Many people are looking for those.
 

Nifty

Printer VIP
Administrator
Joined
Nov 3, 2004
Messages
3,066
Reaction score
1,430
Points
337
Location
Bay Area CA
Printer Model
CR-10, i560 ,MFC-7440N
my latest project is a covering box lid for my installed PIR
Sorry, my brain is dead... what's PIR?
I needed good strength in this box so I set the printer to high quality
More details! Are you increased infill? What else did you change? Are you using PLA or have you moved to ABS?
 

The Hat

Printer VIP
Platinum Printer Member
Joined
Jan 18, 2010
Messages
15,792
Reaction score
8,824
Points
453
Location
Residing in Wicklow Ireland
Printer Model
Canon/3D, CR-10, CR-10S, KP-3
what's PIR?
Passive Infrared Sensor, in plain language, a motion detector.
More details!
Layer Height, Top and Bottom thickness, but above all the Fill Density inside your model gives it real strength, I set that to 100% on certain projects. (Time consuming)

I am currently using PLA despite it being the softer of the two (ABS=Hardest) for most projects it seems to be real tough, I will be switching back to ABS for a few trial runs, but first I want to try another two colour project again...
 

ninj

Print Addict
Joined
Dec 28, 2011
Messages
120
Reaction score
151
Points
193
Great work @The Hat!

Increasing infill does increase strength, but I rarely need to go above 25% infill (usually plenty strong), apart from a part I made for my bike (a temporary derailleur hangar that lasted a couple of hundred miles till I got a proper metal one) I went to 80%. 100% can cause warping or effect surface quality, but is fine for the sort of thin walls in your first image. You can also vary the infill pattern. The latest version of Slic3r (https://github.com/prusa3d/Slic3r/releases) has a cubic infill which is very strong and saves time/filament. I think the latest Cura has something similar. Increasing resolution (ie decreasing layer height) probably weakens the part because it increases the number of joins between layers, the main point of weakness. Another way to increase strength is to increase temperature (within reason) as this makes a better inter-layer bond, at the risk of creating artefacts due to cooling issues. Alternatively, slow down print speed (maybe down to 40mm/s),

Most of the tests I've seen show that PLA has a surprisingly higher tensile strength than ABS, though when it fails it tends to snap rather than bend. It's a good material for low temperature applications and doesn't biodegrade on its own (requires a commercial composter or similar). My derailleur hanger did snap eventually (fortunately I was close to home when the rear mech headed south) but I relied on it longer than I could reasonably expect a thin piece of plastic to perform under constant gear changes (sideways force). I would not have used ABS for that application because it's not rigid enough.
 

The Hat

Printer VIP
Platinum Printer Member
Joined
Jan 18, 2010
Messages
15,792
Reaction score
8,824
Points
453
Location
Residing in Wicklow Ireland
Printer Model
Canon/3D, CR-10, CR-10S, KP-3
Update...
After I made the covering ring for the sewing machine, it didn’t Feckin fit properly, plus I left out another inner ring that would help make the part fit better, so it went back to the drawing board.

The best part of making up your own projects is, if they don’t fit or work you can have another go at correcting the errors, but with free downloaded STL files you got no chance for correction, my part was point 5 of a mm to small, bigger and it would have been fine...

@ninj, All criticism and advice are very very welcome, and in this case, would have cut down on unnecessary infilling and increase my print speed dramatically...:hugs

Capture2.PNG
 

Nifty

Printer VIP
Administrator
Joined
Nov 3, 2004
Messages
3,066
Reaction score
1,430
Points
337
Location
Bay Area CA
Printer Model
CR-10, i560 ,MFC-7440N
Increasing infill does increase strength, but I rarely need to go above 25% infill (usually plenty strong)

Agreed! When I first dropped down to 10% infill I thought things would be weak, but I've not had any problems. Of course, I'm not printing anything so far that gets a ton of pressure to it, but I'm still surprised how strong even 10% infill is!
 

ninj

Print Addict
Joined
Dec 28, 2011
Messages
120
Reaction score
151
Points
193
One other thing I forgot to mention - increasing the number of perimeters to 3 (in Cura I think that's shell thickness=1.2mm for a 0.4mm nozzle) has quite a significant effect on strength. I usually use 2 perimeters if strength not an issue (also extrusion width can be varied in Slic3r, and I think possibly also in Cura).

Agreed! When I first dropped down to 10% infill I thought things would be weak, but I've not had any problems. Of course, I'm not printing anything so far that gets a ton of pressure to it, but I'm still surprised how strong even 10% infill is!
You can often get away with 0% infill for many models that don't require strength. But you need to have your bridging carefully tuned though, if it has a flat(ish) roof.
 

Nifty

Printer VIP
Administrator
Joined
Nov 3, 2004
Messages
3,066
Reaction score
1,430
Points
337
Location
Bay Area CA
Printer Model
CR-10, i560 ,MFC-7440N
You can often get away with 0% infill for many models that don't require strength. But you need to have your bridging carefully tuned though, if it has a flat(ish) roof.

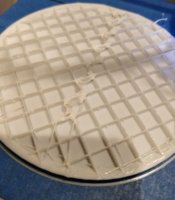
Wow man, you're always right there with stuff as I'm learning it! I tried to use 10% fill for this big print and the distance between points was too big to bridge at the speed I'm printing... and this happened:

print.jpg

:(

So, I bumped to 20% and it's going much better now.
 
Top