pearlhouse
Print Addict
- Joined
- Feb 17, 2011
- Messages
- 227
- Reaction score
- 76
- Points
- 183
- Location
- Brunswick, Ohio USA
- Printer Model
- Canon mx892 & mx922
Ive been refilling for several years now but had no experience flushing carts. I believe flushing can be best done thru the ball hole. Here is what Ive been doing lately.
1. Remove tape that covers ball just enough to expose ball. Use a razor knife to cut out a circle. The remaining tape is important for resealing.
I took a very small cup hook and pressed it in the indent while turning to get it to thread in. You could probably just heat the tip of the screw first. Then pull the ball out.
Keep the ball.
2. For flushing I recently devised my own way similar to this link from Octoinkjet.com.uk ---
http://www.octoink.co.uk/products/Cartridge-Flush-Clip-Set-%5BCanon%5D.html
I made a flushing clip out of an orange cover either style will work. Clip on or rubber band on.
You need a drill press or good hand drill for the next step. Buy a couple of automotive grease fittings at your local auto parts store. I believe these are 1/8 NPT. Clamp fitting in vise up side down and drill bottom of fitting to remove cover that holds spring and sealing ball in place. Now you should have an open hole thru the fitting. Drill a hole in the clip slightly smaller than the threaded dia of the fitting. This is known as tap drill size. Screw the fitting into the orange clip by pressing and turning. Don’t let it protrude thru on the inside. I used Loctite thread locker on the threads to get a good seal but you could try super glue or other glue. Attach clip with rubber-band tightly or just clip onto the port.
3. Buy a pc. of latex (brown tubing 5/16OD X 3/16 ID that fits onto the end of the fitting) from Home Depot or while you are at the auto parts store you may be able to buy a pc. of hose that fits snuggly on the grease fitting. Push hose onto fitting and other end can go on end of large syringe or in my case I adapted it to a short pc of garden hose with a fitting on the end. Attach it to a faucet.
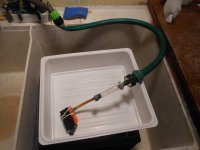

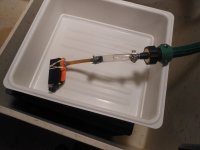
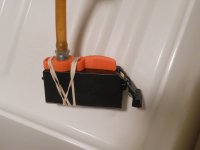
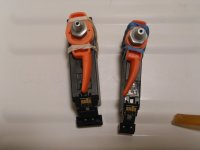
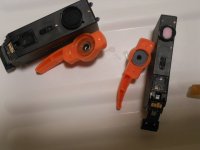
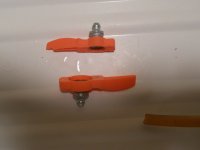
By flushing thru the port the water will exit the ball hole and you can plug it gently with your finger to force water through the vent. If you have a German fill hole you can force water out of it by using your finger to plug ball hole and vent. Takes about 60 seconds of flushing. Longer is better if you have the patience. I rotated cart to different positions during the 60 seconds. You can blow the water out through the ball hole using your mouth or a syringe, then use the paper towel method to wick out the remaining. Then use the pharmacist solution to condition the sponge so it will easily soak up the refilling ink. Again use paper towel to wick out remaining solution.
4. With the ball threaded on the end of the cup hook you can press the ball back in until you feel it pop in. Remove cup hook and then cut a pc of alum tape (from heating and plumbing section at Home Depot). Place over hole and overlap a little on the sides of cart. Press real good using your finger nail to get a good seal. You should be able to see the circular hole imprint through the tape to know you have a good seal. This tape will stick real good to the remaining label material I mentioned at the beginning. This would be for German filling method. If you want to go Top fill then purchase the silicone plugs that install flush from Precision Colors and then cover them with a pc of alum tape. Ive tried all of the other ways of plugging the holes and none of them work 100% of the time and if and when you get a leaker you got a real mess to clean up.
5. I have always used the German refill method because once you are setup its quick and easy and no mess. See the pharmacist thread for this refill method.
http://www.printerknowledge.com/threads/german-durchstich-refill-method-for-canon-carts-with-pictures.2187/#post-14769
I use squeeze bottles with 2” long 21g needles sharpened to a point like a medical needle. I even honed this point with a stone so it is extra sharp and can penetrate the sponge easily. If you do not have the side window on your carts then I just look at the bottom of the cart where there is a prism ( a little clear pc of plastic) right next to the chip. You should be able to see the ink fill this area when the cart is close to full. Then turn the cart over to let the sponge soak up the ink. Then fill a second time using the same procedure. Then I have a very accurate postal scale I use to weight the cart so I can tell if I am really full. For all the 220-221 225-226 carts I use 19-20g (small cart)and 29-30g (lg. cart). One thing Ive learned is don’t fill too many spares is advance because strange things happen inside the cart while just sitting around. There is a new thread that Hat started about carts that don’t work to well after sitting around for a while. Its titled “Has this happened to you.
http://www.printerknowledge.com/threads/has-this-happened-to-you.8600/page-2#post-68204
There is a lot of interesting stuff here about the ins and outs of flushing carts. Up to now I have never flushed carts, but recently I think I got into some bad blk. ink and have been having lots of problems. So I purchased new ink from Precision Colors both the bk and pgbk. So once I get the ink and start refilling maybe I will be able to draw some conclusions. Stay tuned.
1. Remove tape that covers ball just enough to expose ball. Use a razor knife to cut out a circle. The remaining tape is important for resealing.
I took a very small cup hook and pressed it in the indent while turning to get it to thread in. You could probably just heat the tip of the screw first. Then pull the ball out.
Keep the ball.
2. For flushing I recently devised my own way similar to this link from Octoinkjet.com.uk ---
http://www.octoink.co.uk/products/Cartridge-Flush-Clip-Set-%5BCanon%5D.html
I made a flushing clip out of an orange cover either style will work. Clip on or rubber band on.
You need a drill press or good hand drill for the next step. Buy a couple of automotive grease fittings at your local auto parts store. I believe these are 1/8 NPT. Clamp fitting in vise up side down and drill bottom of fitting to remove cover that holds spring and sealing ball in place. Now you should have an open hole thru the fitting. Drill a hole in the clip slightly smaller than the threaded dia of the fitting. This is known as tap drill size. Screw the fitting into the orange clip by pressing and turning. Don’t let it protrude thru on the inside. I used Loctite thread locker on the threads to get a good seal but you could try super glue or other glue. Attach clip with rubber-band tightly or just clip onto the port.
3. Buy a pc. of latex (brown tubing 5/16OD X 3/16 ID that fits onto the end of the fitting) from Home Depot or while you are at the auto parts store you may be able to buy a pc. of hose that fits snuggly on the grease fitting. Push hose onto fitting and other end can go on end of large syringe or in my case I adapted it to a short pc of garden hose with a fitting on the end. Attach it to a faucet.


By flushing thru the port the water will exit the ball hole and you can plug it gently with your finger to force water through the vent. If you have a German fill hole you can force water out of it by using your finger to plug ball hole and vent. Takes about 60 seconds of flushing. Longer is better if you have the patience. I rotated cart to different positions during the 60 seconds. You can blow the water out through the ball hole using your mouth or a syringe, then use the paper towel method to wick out the remaining. Then use the pharmacist solution to condition the sponge so it will easily soak up the refilling ink. Again use paper towel to wick out remaining solution.
4. With the ball threaded on the end of the cup hook you can press the ball back in until you feel it pop in. Remove cup hook and then cut a pc of alum tape (from heating and plumbing section at Home Depot). Place over hole and overlap a little on the sides of cart. Press real good using your finger nail to get a good seal. You should be able to see the circular hole imprint through the tape to know you have a good seal. This tape will stick real good to the remaining label material I mentioned at the beginning. This would be for German filling method. If you want to go Top fill then purchase the silicone plugs that install flush from Precision Colors and then cover them with a pc of alum tape. Ive tried all of the other ways of plugging the holes and none of them work 100% of the time and if and when you get a leaker you got a real mess to clean up.
5. I have always used the German refill method because once you are setup its quick and easy and no mess. See the pharmacist thread for this refill method.
http://www.printerknowledge.com/threads/german-durchstich-refill-method-for-canon-carts-with-pictures.2187/#post-14769
I use squeeze bottles with 2” long 21g needles sharpened to a point like a medical needle. I even honed this point with a stone so it is extra sharp and can penetrate the sponge easily. If you do not have the side window on your carts then I just look at the bottom of the cart where there is a prism ( a little clear pc of plastic) right next to the chip. You should be able to see the ink fill this area when the cart is close to full. Then turn the cart over to let the sponge soak up the ink. Then fill a second time using the same procedure. Then I have a very accurate postal scale I use to weight the cart so I can tell if I am really full. For all the 220-221 225-226 carts I use 19-20g (small cart)and 29-30g (lg. cart). One thing Ive learned is don’t fill too many spares is advance because strange things happen inside the cart while just sitting around. There is a new thread that Hat started about carts that don’t work to well after sitting around for a while. Its titled “Has this happened to you.
http://www.printerknowledge.com/threads/has-this-happened-to-you.8600/page-2#post-68204
There is a lot of interesting stuff here about the ins and outs of flushing carts. Up to now I have never flushed carts, but recently I think I got into some bad blk. ink and have been having lots of problems. So I purchased new ink from Precision Colors both the bk and pgbk. So once I get the ink and start refilling maybe I will be able to draw some conclusions. Stay tuned.


