MP Select Mini: Bed not heating - Broken Wire

The Hat

Printer VIP
Platinum Printer Member
Joined
Jan 18, 2010
Messages
15,822
Reaction score
8,852
Points
453
Location
Residing in Wicklow Ireland
Printer Model
Canon/3D, CR-10, CR-10S, KP-3
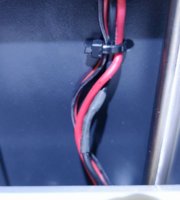
Just about 10 days into having this printer and I noticed that my bed wasn't heating up properly, so I checked underneath and found the negative lead basically cut in half!
I intend to make a divider to go under the platform to separate the wiring loom from the gear wheel, this should prevent any mishaps in the future, it was silly of them to not have for seen this situation developing in the first place...

It’s another great excuse to design and build newer pieces for the printer...:D
 

Nifty

Printer VIP
Administrator
Joined
Nov 3, 2004
Messages
3,067
Reaction score
1,432
Points
337
Location
Bay Area CA
Printer Model
CR-10, i560 ,MFC-7440N

apetitphoto

Printer Guru
Joined
May 27, 2017
Messages
180
Reaction score
176
Points
127
Location
Killeen, TX
Printer Model
Epson WF-3620 , Epson wf-7210
So how much of the printing from these things is done to make printing possible?

Maybe I should think about creating a 3D printer kit, the "Essential Mods."
 

The Hat

Printer VIP
Platinum Printer Member
Joined
Jan 18, 2010
Messages
15,822
Reaction score
8,852
Points
453
Location
Residing in Wicklow Ireland
Printer Model
Canon/3D, CR-10, CR-10S, KP-3
I think I'll print this side-panel mod: https://www.thingiverse.com/thing:2451362
and this guide: https://www.thingiverse.com/thing:1937513
... then re-route the cables under the bed, out the back, and through the side-panel.
Hmm, things are starting to get very interesting, I intended doing some sort of modification to my wiring, so I like the idea of entering the case from the side, it’s better than pulling the whole printer apart just to reroute a few darn wires

This is my preferred option too ... :thumbsup
Capture.PNG
 

Nifty

Printer VIP
Administrator
Joined
Nov 3, 2004
Messages
3,067
Reaction score
1,432
Points
337
Location
Bay Area CA
Printer Model
CR-10, i560 ,MFC-7440N
Well, I'm impatient and it's already been 2 days and no reply from MP, so I just soldered the wire in place. Nothing really stopping it from happening again, but at least I'm back printing.

I'm still debating if I should return this one or not. I'm tempted to return this and get a CR-10 or something a bit bigger.

wires.jpg
 

The Hat

Printer VIP
Platinum Printer Member
Joined
Jan 18, 2010
Messages
15,822
Reaction score
8,852
Points
453
Location
Residing in Wicklow Ireland
Printer Model
Canon/3D, CR-10, CR-10S, KP-3
Well, I'm impatient and it's already been 2 days and no reply from MP, so I just soldered the wire in place. Nothing really stopping it from happening again, but at least I'm back printing.
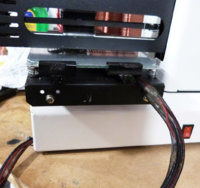
Just an update on mine, last night it started to smell of burning, so I switched off the platform heat and that alleviated the problem, but on examining the wiring loom the cable ties made the matter worse by not allowing the cables to flex and turn easily so they cracked and started to heat up.

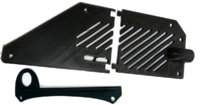
The Pic above shows an excellent way to solve this problem, which I intend to use, but the STL file provided only has half of the covering, the left side is missing, but I’ll make the right side and install it regardless, and then I’ll design the other side, but not as good...

This upgrade is not as hard or as difficult as it looks, it’s only a matter of removing the side cover plate and pulling the plug (From the Motherboard easy) that’s connected to the heat plate and re-routing the wiring out and around the back of the platform and in the side using this new piece...
Returning my baby was never an option...
 

The Hat

Printer VIP
Platinum Printer Member
Joined
Jan 18, 2010
Messages
15,822
Reaction score
8,852
Points
453
Location
Residing in Wicklow Ireland
Printer Model
Canon/3D, CR-10, CR-10S, KP-3

The Hat

Printer VIP
Platinum Printer Member
Joined
Jan 18, 2010
Messages
15,822
Reaction score
8,852
Points
453
Location
Residing in Wicklow Ireland
Printer Model
Canon/3D, CR-10, CR-10S, KP-3
OK.. More on my modifications.

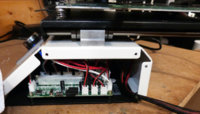
With the side panel removed from the printer, I could pull the two plugs attached to the PC board that were connecting the thermostat and heating panel that were leading up to the platform.

Once I had these wires isolated I remover the heating panel from the platform, I trimmed the wires that were damaged and soldered back on longer wires that I had dug out of a box of PC accessories, that were left over from previous upgrades. (Exact plugs also)
New Wiring.jpg Side Panel.jpg click to enlarge.

Because I hadn’t made the new wire bracket and side panels yet I secured the newly positioned wiring in place just temporary with a couple of cable ties, and then proceeded to test the modifications while printing the necessary parts that I needed.
New Sides Bracket.jpg New side panel and platform bracket.

Everything went exactly to plan, but a bonus was when running the printer with the side panel removed, the printer ran much cooler, so I intend putting a new venting panel on the left side of the printer also, that will eliminate the necessity to add cooling fans, as some other owners have done..
 
Top