Meltdown of Print Head Alignment

eppyson

Getting Fingers Dirty
Joined
Dec 9, 2019
Messages
22
Reaction score
10
Points
33
Printer Model
Epson WF-7710
Try cleaning the timing wheel on the far left side of the printer..
Also give the timing strip behind the print head another good clean, just to be sure..
P.S. Can you post up a crop of the Pic showing the problem...
Thanks. I posted images showing the vertical head alignment pattern before and after the trouble started. The second image shows exactly how the last 20 prints look. Nothing I do makes any change, including changing numbers using the alignment program. They seem stuck in the position shown on my second image.

How can I clean the timing strip without doing damage to it? Simple kleenex OK? Any liquid?

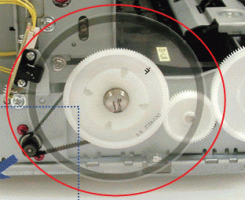
Could you help me identify which is the timing wheel?
 

The Hat

Printer VIP
Platinum Printer Member
Joined
Jan 18, 2010
Messages
15,821
Reaction score
8,851
Points
453
Location
Residing in Wicklow Ireland
Printer Model
Canon/3D, CR-10, CR-10S, KP-3
Thanks. I posted images showing the vertical head alignment pattern before and after the trouble started. The second image shows exactly how the last 20 prints look. Nothing I do makes any change, including changing numbers using the alignment program. They seem stuck in the position shown on my second image.

How can I clean the timing strip without doing damage to it? Simple kleenex OK? Any liquid?

Could you help me identify which is the timing wheel?
I’ve asked for a cropped photo showing the lines, not a head alignment..
The timing strip can be cleaned with a paper towel soaked in window cleaner, (Both side)
Here is the timing wheel from a Canon printer…

5128_paper_wheel.png
P.S. if the line is cause by timing, then all the cleaning in the world won’t fix it..
 

stratman

Printer VIP
Platinum Printer Member
Joined
Apr 19, 2007
Messages
8,706
Reaction score
7,170
Points
393
Location
USA
Printer Model
Canon MB5120, Pencil
Found a video that supposedly addresses your exact issue. Read the comments as there may be further insight into this procedure. I do not use Epson so maybe you can make better sense of it than I.


I would try an automatic alignment first as this might "reset" things. Then do manual alignments as the video discusses, working your way to the desired number Epson recommends as being in alignment.
 

JemsenJordan

Newbie to Printing
Joined
Feb 26, 2022
Messages
1
Reaction score
0
Points
6
Printer Model
L3158
Have you found a solution to this problem?
 

Mrantz

Print Lurker
Joined
Sep 13, 2023
Messages
2
Reaction score
0
Points
1
Printer Model
Epson WF-7720
Hi all. I hope you can help me with an odd problem.

For awhile, I’ve been using an Epson WF-7710 to print images on Canon semi-gloss paper. I’m using a CISS but only fill it with Epson 512 bottled ink. Have never used anything but that ink and have always had good results with this setup. Bidirectional printing is always turned off. High speed printing is always turned off.

I noticed a very subtle white line on my prints the other day. Printed out a nozzle check to see if the heads needed cleaning. The printout was perfect. No gaps, etc.

So I decided to run the built-in print head alignment -- the one on the product screen, not in the driver; there isn’t one on the driver; just the product itself. Horizontal alignment printout was fine.

The vertical alignment is where my trouble started. The first vertical alignment printout before changing anything showed just what I expected—a few boxes with very slight gaps. So I began the alignment procedure per the instructions, selecting the best # box, etc.

The minor gaps in #1 and #4 disappeared on the first pass, but the other four boxes suddenly showed major gaps. I re-ran the alignment, choosing new numbers per the instructions, but nothing changed. By the 3rd or 4th pass, four of the boxes were “stuck” with wide gaps. Nothing I do makes any difference. The last 10 re-passes and printouts are identical to each other – two boxes fine, but four with huge gaps. Selecting different numbers during the alignment does nothing.

See printouts below.

During this process, I rechecked the nozzles several times – still showed perfect patterns on the printout. I cleaned the heads anyway a couple of times. Nozzle checks remained perfect throughout. Also, rechecked horizontal alignment, which remained fine.

Also tried turning on/off bidirectional printing. Same problem either way.

Prior to this odd situation, I had never had any problems with alignment. Its like the heads suddenly went rogue the minute I started the head alignment and now they’re stuck in what seems like the extreme-most positions.

Any suggestions?


View attachment 12425


View attachment 12426


View attachment 12427

eppyson & community -​


I know you posted this a while ago. I hope by now you were able to resolve this issue, or maybe, you've thrown in the towel on your Epson printer and moved on ! Either way, I'm going to go ahead an post this so that maybe it might help others in the future who may run into this same issue. Obviously, I was running into this same problem with the 3 Epson printers I have (WF-7720 & WF-7840 & WF-3640). The 3640 was the worst, and at one point I had major lines in every box, in every set of the vertical alignment page. So, here is what ultimately got me out of this mess. I was able to verify that this approach works across all 3 WF printers I own.

First of all, if you start this and you want to complete it, be sure to have spare time set aside and some patience. I can be a bit of a process. So here are the steps that I took. To set a baseline starting point, let's assume the worse case scenario - major lines in all sets of your vertical alignment sheet....

First run, reset the alignment numbers to an extreme, so pick either 1 or 7 and set all of them to that number, and rerun the alignment. NOTE: You may want to set all the black sets to 7, and all the colored sets to 1 and realign. Now compare the 2 alignments.

You SHOULD see some changes. Now, in deciding what to do next, look at each set:

1) If a set got better (less lines) - then set it to the number you had previously (if the lines are still pretty significant, then set it to either a 1 or 7 again, but if you've gotten a shift that's much better, then you might want to choose, say either a 2 or 3 (or 5 or 6 on the other end).

2) If a set actually got worse, then I suggest setting the number to the OPPOSITE extreme you first picked. So rather than setting a set to 7, you would set it to 1, Or instead of a 7 you would set it to 1. I'm sure you get the idea.

3) If you got lucky on a group, or several groups and the "middle number", the column that you're trying to align, turns out to be the one with no lines in it - PERFECT, consider that group done, and make no changes to the value on your alignment settings. Now, in theory... you shouldn't have to adjust that grouping any more. But that could change as you work to correct the other groupings and get the box with with the middle value to be the one with no lines.

And that is basically about it !! You just keep repeating this process over and over again... and over and over again!! On the WF-3640 that was really jacked up, it took about 24 alignment runs to get it just about perfect. So patience is key, and don't be afraid to use the low end/high end numbers. You won't hurt print head by doing so. You're really just trying to get a change in that grouping, either good or bad, doesn't matter. Once you get a change in an alignment group, that kick starts this process of getting that print head aligned in that particular group.

Remember, the 2 "sets" of alignment boxes (all black boxes, and all colored (mine happen to be red) are vertically aligned as an individual group (meaning, changes in alignment you make for the black set will not change the alignment for the colored boxes) - so once you get, say all the black boxes with no lines appearing in the "middle", then any alignment changes you make in the colored set should not change the black. This also means that you can work to alignment both sets (black & colored sets) at the same time, during each alignment run.

That's it people. I hope this helps anyone beating their head against the wall trying to get this resolved. It can be done, just takes some patience and trial and error.

Good Luck, and happy printing !!

Regards,
Matt R.
 

Mrantz

Print Lurker
Joined
Sep 13, 2023
Messages
2
Reaction score
0
Points
1
Printer Model
Epson WF-7720
Have you found a solution to this problem?
Hello - since you were the last poster in this topic, just thought I would let you know that I posted a solution that worked for me. Check it out. Good Luck.

-Matt R
 

aCuria

Printing Apprentice
Joined
Aug 18, 2023
Messages
46
Reaction score
0
Points
11
Printer Model
Canon 5070, Epson L10850
I suspect Choosing “1” makes box “1” become box “4” in the next pass

This allows selection of -1, -2, -3 and so on
 

Funkymonk

Newbie to Printing
Joined
Apr 14, 2021
Messages
1
Reaction score
2
Points
6
Printer Model
Epson wf-7610
Hi.

I only registered to thank Mranz the explanation of the metod he followed. It worked for me.
My WF-7710 was only capable to print in "not bidirectional" mode (slow). Now it can print at top speed.

Thanks again.
 

R Bust

Print Lurker
Joined
Oct 24, 2024
Messages
1
Reaction score
0
Points
1
Printer Model
7710 and 7720
This is the exact problem I have with my 7710. I have done everything also, because with this alignment problem, all documents and reports are blurry.
 
Top