Gloss Optimizer - Epson

Ink stained Fingers

Printer VIP
Platinum Printer Member
Joined
Dec 27, 2014
Messages
6,056
Reaction score
7,228
Points
363
Location
Germany
Printer Model
L805, WF2010, ET8550
I tested one more ink set for the R1900 by Aomya , a Chinese ink manufacturer via Aliexpress, that ink performs quite well overall, good and uniform gloss, but not as good as the best mentioned above - precision colors K3HD inks and another Chinese ink set - the gamut volume is about 5% less.
 

Ink stained Fingers

Printer VIP
Platinum Printer Member
Joined
Dec 27, 2014
Messages
6,056
Reaction score
7,228
Points
363
Location
Germany
Printer Model
L805, WF2010, ET8550
I think I can close up my tests for a decent R800 ink set - with good gamut - no bronzing and no gloss differential as the main criteria, and with my personal judgement. I was looking basically for a CMYK inkset, with a good photo black since I want to use the same inks in my Pro 7600, and I'm mixing the additional R800 colors blue and red from the base colors. Some of the inksets as tested were inksets for the R1900 instead, from China but they would ship as well any other color combinations upon request.
I was always using the same paper - the Aldi/Netbit photo glossy 300gr, a very good budget paper, results are similar or better with premium papers , a Premium Plus photo paper glossy by HP or a Photo Glossy PG230 by Tecco which give an even smoother gloss finish but are 3-5x more expensive.
I tested 10+ ink sets as reported above, the best overall inkset turned out to be the Precisioncolors K3 HD inks , with the widest gamut, a good and uniform gloss without gloss optimizer, some bronzing without GO, but quite uniform, and no bronzing and a better gloss with a GO overprint.
A very close 2nd runner is a Chinese ink via Aliexpress
https://www.aliexpress.com/item/8-C...32378082857.html?spm=2114.13010608.0.0.Fay7F3
(this link may not be online for an extended period of time)
The ink is labelled mainly in Chinese, with a hint to the ink manufacturer http://www.ink168.com/en/homepage.htm
This ink set is more budget priced, and looks quite similar to the PCK3HD inks, uniform gloss, slightly less than the blank paper and some even bronzing w/o GO, the bronzing goes away with the GO overprint, the gloss equalizes between unprinted and printed areas.
I didn't like the appearance of several other inks tested, OCP, other Chinese inks, InkTec and others, they show varying bronzing effects between different colors, uneven gloss between different colors and the base paper which create strange effects like relief effects in reflecting light, effects which didn't go away completely with a GO overprint. Vermont Conecolor ink gave a pretty big gamut but was disappointing with the surface appearance.
I tested some of the more appealing inks as well on various lustre/silk/semiglossy type papers,
it is a matter of personal preference which one is considered to be the best, the surface effects and the look of these papers printed vary significantly.
I tested as well the GO overprint on a dye print with the Fujfilm DL inks, the GO expands the gamut significantly, visible in direct comparison.

P.S. I tested this Chinese ink as well on 2 budget cast coated glossy papers - 180/230 gr, the prints look very good, visibly better than with some other inks, and better as well than with the Aldi/Sihl glossy 270gr paper.
 
Last edited:

Umberto Gladys

Getting Fingers Dirty
Joined
Sep 19, 2015
Messages
16
Reaction score
5
Points
24
Printer Model
Epson 3800
Does this Chinese vendor make a set of inks for the 3800 & 3880?
 

Ink stained Fingers

Printer VIP
Platinum Printer Member
Joined
Dec 27, 2014
Messages
6,056
Reaction score
7,228
Points
363
Location
Germany
Printer Model
L805, WF2010, ET8550
Does this Chinese vendor make a set of inks for the 3800 & 3880?
I don't know, the 38x0 does not use a gloss optimizer so results, gloss etc may look different on your paper. But you can contact the supplier via the link above and ask them for other ink sets. I'll go and order next time just CMY PK, I don't use matte black and will mix the other colors, and just dilute C and M to LC and LM for my Pro 7600 . And I don't like to switch between photo and matte black although I print some output on matte and fiber type material. And the leftover orange ink of the current inkset will be mixed with some magenta to red. I'm doing profiles myself so small color deviations will be compensated. And I would recommend to do some ink testing yourself, you may look for and see other effects in printouts, you are using other papers - all which has impact on the final outcome. As soon as you leave the main route by the OEM suppliers - Epson, Canon etc - with their genuine inks and papers - and start using other papers and inks you are faced with a myriad of combinations which you have to sort out by your criteria, you'll find a wide variance in the results.
 
Last edited:

Ink stained Fingers

Printer VIP
Platinum Printer Member
Joined
Dec 27, 2014
Messages
6,056
Reaction score
7,228
Points
363
Location
Germany
Printer Model
L805, WF2010, ET8550
I also use the GO overprint to seal the surface 24 hours after printing for better longevity and scratch resistance...

this comment let me test whether the timing of the GO overprint would make a difference - I'm getting the best results when I let the printouts dry overnight and apply the GO overprint the next day, the GO effect is the least when I activate the GO (full) with the printouts on glossy paper, the look is getting somewhat better after about 30 min waiting time for the GO overprint , and is the best after the overnight wait. It's probably surface effects how the pigments dry up on the paper coating and how long it takes for the solvent to completely evaporate. An 'instant dry' paper can be touched directly after printout but not all the solvents are gone yet
 

The Hat

Printer VIP
Platinum Printer Member
Joined
Jan 18, 2010
Messages
15,790
Reaction score
8,822
Points
453
Location
Residing in Wicklow Ireland
Printer Model
Canon/3D, CR-10, CR-10S, KP-3
@Ink stained Fingers, here is another test you can do with the GO overprints on two photos, leave one to dry for 15 minutes and then leave the second overnight.

When applying the GO as an overprint, don’t use a solid or a tinted overlay as before, but use the same photo again as the template and print that as your GO image and it will only cover the area that has ink applied to the surface, you'll get different finish...
 

Ink stained Fingers

Printer VIP
Platinum Printer Member
Joined
Dec 27, 2014
Messages
6,056
Reaction score
7,228
Points
363
Location
Germany
Printer Model
L805, WF2010, ET8550
Yes, thanks for pointing out even more options, I tried something like printing various images - 10+ - in one batch - and then starting to apply GO in a second batch immediately after, that made a +-15 min break , but those prints didn't look as good as those drying overnight.
If I don't apply an even GO layer some bronzing remains on the uncovered color areas, I recognize the bronzing effect more easily under incandescent light and the gloss differences better under diffuse daylight. I now have 2 Chinese inks and the precisioncolors K3HD inks which perform very well, I'm now rounding up my tests with some more papers like the silk/lustre/semiglossy ones I started the testing with and some other glossy type papers - HP - Canon PT101 - Tecco PG230 and some cheap castcoated papers. Oh, and before I forget, I tested as well some different gloss optimizers coming with the ink deliveries, they don't seem to make much of a difference, only their smell is different...
 

The Hat

Printer VIP
Platinum Printer Member
Joined
Jan 18, 2010
Messages
15,790
Reaction score
8,822
Points
453
Location
Residing in Wicklow Ireland
Printer Model
Canon/3D, CR-10, CR-10S, KP-3
@Ink stained Fingers, There are so many variations you can get when applying GO to different surfaces of satin and gloss, but the one thing I found was the less GO I applied the better the results, I use a gloss and satin mixture of GO for the best effects using a very light tint of an Auvergne colour...

I am not bothered much by the little border I get on the edge of the prints using this method, because its only noticeable when the prints are held in the hand, the other option of course is borderless which I don’t care to use...
 

Ink stained Fingers

Printer VIP
Platinum Printer Member
Joined
Dec 27, 2014
Messages
6,056
Reaction score
7,228
Points
363
Location
Germany
Printer Model
L805, WF2010, ET8550
I tested some semiglossy/lustre/silk type papers with two Chinese inks - by ink168.com as mentioned above and by Aomya, both via Aliexpress, both give a very similar look, Aomya inks with very slightly (only visible by direct comparison) more bronzing on glossy papers which goes away with the GO overprint. I tested these papers either by doing the GO overprint almost immediately after the print or I let the prints dry overnight before applying the GO. This timing gives visible differences, more than on glossy papers, bronzing is gone on all papers but the immediate overprint creates a glossier look than the overprint the next day, with two of the papers the difference is pretty significant - as if I used different papers to start with, the surface structure remains but the direct overprint gives a visibly glossier sheen than the overnight overprints. So it's overall quite a complex game with lots of variables (inks, papers, timing, paper choices, cost and personal expectations ) to acheive prints you like at the end
 

Ink stained Fingers

Printer VIP
Platinum Printer Member
Joined
Dec 27, 2014
Messages
6,056
Reaction score
7,228
Points
363
Location
Germany
Printer Model
L805, WF2010, ET8550
I did some more testing to check for the impact of the gloss optimizer beyond the gloss improvements and removal of bronzing effects.

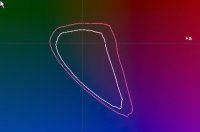
I used a Tecco PG230 glossy photo paper, printed the profile target patches - one sheet with GO and another sheet without GO, same ink, same printer and driver settings, and created the resp. icm-profiles.
GO Impact R800.jpg

They differ significantly in the darker range - below L=25 , the print with GO yields a very good black level of L=5, the profile w/o GO just gives a poor L=12. The differences are directly visible in this image displaying the gamuts of both - the wider one shows the effect of the GO vs. the print w/o GO. Such a difference between the gamuts is visible in printouts.

And I checked for a corresponding effect with dye inks, I printed the profile target patches on a L800, onto the same paper, with the Fujifilm DL dye inks, and I overprinted one sheet with GO in the R800.
You see the opposite effect:
GO Impact L800 1.jpgGO Impact L800 2.jpg

The black level, the bottom tip remains at l=4, but the gamut shape at darker colors is smaller with GO than w/o GO, visible as well in the cut of the gamut at L=20, the wider area is covered by the magenta line, the profile w/o GO. Since the black level remains the same these differences are not really visible in printouts, but my overall conclusion is that GO does not do much good on dye prints.
There may be other effects like some UV protection or scratch protection which I have not tested for.
 

Latest posts

Top