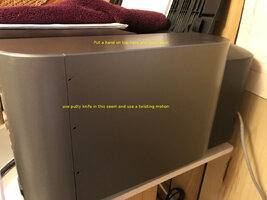
Canon Pro-100 cabinet removal procedure.

FWP

Getting Fingers Dirty
Joined
Jun 5, 2021
Messages
11
Reaction score
15
Points
33
Location
Maryland, USA
Printer Model
i860, i960, MX340, (2) Pro 100
Using the wrong Service Tool version may make Service Mode inaccessible even subsequent tries with the correct version. Additionally, what used to work may not work now for your model. Also, the sequence of button pushes to enter Service Mode (to be able to use the Service Tool) is specific to the printer model. So don't start trying things until you get solid info first.

The Service Tool King of the forum is @PeterBJ. He has an entire thread on this topic. The '@' followed by the forum member's name will send a notification that someone mentioned the member specifically in their post. In other words, Peter will now be notified of my post and therefore your questions on resetting the Pro 100 waste ink counter to factory fresh.
Thank you this helps moving forward, I will seek his counsel.
 

MichaelDargan

Getting Fingers Dirty
Joined
Oct 9, 2019
Messages
12
Reaction score
6
Points
28
Location
Retired
Printer Model
Canon Pro1 Epson 730 & SCP600
I had one of these printers. The print head failed so I replaced it only to have a fault in the motherboard appear which would have meant spending hundreds more to resolve. Having already spent hundreds of dollars on ink I cut my losses and took it to the tip after letting it sit in the garage for a while while I thought of my options. I ended up buying an Epson SC600 and it has performed flawlessly. The Canon is a great printer, when it goes, but it seems prone to faults. It is a very complicated design with specific needs in managing it. If I had some of the experts here within easy distance I might have been able to resurrect it but realistically I’m not sorry to see it go.
 

The Hat

Printer VIP
Platinum Printer Member
Joined
Jan 18, 2010
Messages
15,792
Reaction score
8,824
Points
453
Location
Residing in Wicklow Ireland
Printer Model
Canon/3D, CR-10, CR-10S, KP-3
I had one of these printers. The print head failed so I replaced it only to have a fault in the motherboard appear... It is a very complicated design with specific needs in managing it
You must be the most unfortunate Pro 100 owner of all times, because the reliability longevity are second to none with this printer, complicated it’s not, more like easy and simple, but everyone to his own… My two cent worth..
 

Pinegrovedave

Newbie to Printing
Joined
Nov 22, 2024
Messages
4
Reaction score
0
Points
6
Printer Model
Canon Pixma Pro-100
Hello everyone...New member here as well as a long time Pro-100 owner/user(10 years+). This seems to be the only source that describes the disassembly of the Pro-100 anywhere. I'm pretty handy with tools and whatnot...been doing my own PC builds for 35 years, repair audio equipment to component level...stuff like that, but I'm at a bit of an impasse right out of the gate here. I see in the pic the locations of the tabs for the top panels. I can even "feel them when I slip a cell phone opening tool under the lip of the top panel. What is puzzling me is the statement "push on the edge of the hook tabs to release the rear corner"...Push how? Press down on the top panel and then push the top panel to the rear to release? Or do I need to slip a some type of shiv under the top panel and "push" the tabs? Forgive my confusion, but any clarification would be tremendously appreciated.
LS-Panel.jpg
 
Last edited:

FWP

Getting Fingers Dirty
Joined
Jun 5, 2021
Messages
11
Reaction score
15
Points
33
Location
Maryland, USA
Printer Model
i860, i960, MX340, (2) Pro 100
Hi I will look at my notes and get back to you. I don't clearly remember how I did this. Its been a few years.
 

Pinegrovedave

Newbie to Printing
Joined
Nov 22, 2024
Messages
4
Reaction score
0
Points
6
Printer Model
Canon Pixma Pro-100
Hi I will look at my notes and get back to you. I don't clearly remember how I did this. Its been a few years.
Understood my friend. Any insight/direction will be appreciated.
 

FWP

Getting Fingers Dirty
Joined
Jun 5, 2021
Messages
11
Reaction score
15
Points
33
Location
Maryland, USA
Printer Model
i860, i960, MX340, (2) Pro 100
OK in slide or picture two if you zoom in on it, you can see how the panel attachment tabs work. The whole panel needs to be pushed back about 3/8" or 10mm to disengage it. I used a 2 or 3" wide plastic putty knife that I sanded to a better point. I then used it in a twisting motion (sticking between the side of the panel and the front corner of the printer). I hope that makes sense. I put one hand on the top of the panel and pushed back while twisting with the putty knife. Once the panel moves back about 10mm it will be disengaged and you can lift it away. Inspect all panels you remove and make sure none of the holding tads have broken off. If so you must find it and remove it. Anything loose inside the printer could ending up lodged in a gear or some moving part and damage and or destroy the printer. I hope this adds enough clarity to help you out.
 

Attachments

  • IMG_3342_1.JPEG
    IMG_3342_1.JPEG
    133.7 KB · Views: 8

Pinegrovedave

Newbie to Printing
Joined
Nov 22, 2024
Messages
4
Reaction score
0
Points
6
Printer Model
Canon Pixma Pro-100
OK in slide or picture two if you zoom in on it, you can see how the panel attachment tabs work. The whole panel needs to be pushed back about 3/8" or 10mm to disengage it. I used a 2 or 3" wide plastic putty knife that I sanded to a better point. I then used it in a twisting motion (sticking between the side of the panel and the front corner of the printer). I hope that makes sense. I put one hand on the top of the panel and pushed back while twisting with the putty knife. Once the panel moves back about 10mm it will be disengaged and you can lift it away. Inspect all panels you remove and make sure none of the holding tads have broken off. If so you must find it and remove it. Anything loose inside the printer could ending up lodged in a gear or some moving part and damage and or destroy the printer. I hope this adds enough clarity to help you out.
Gracias Amigo. OK, I've done that earlier, but I guess I just have to really put some effort into it. I initially didn't put any considerable force into for fear of breaking something. Thanks again.
 

FWP

Getting Fingers Dirty
Joined
Jun 5, 2021
Messages
11
Reaction score
15
Points
33
Location
Maryland, USA
Printer Model
i860, i960, MX340, (2) Pro 100
Gracias Amigo. OK, I've done that earlier, but I guess I just have to really put some effort into it. I initially didn't put any considerable force into for fear of breaking something. Thanks again.
OK good, please let me know the results and if you succeed in repairing your Pro 100.
Have a great day.
 
Top