Brother DCP-J4110DW Print Profile

Zandhoeg

Newbie to Printing
Joined
Nov 29, 2024
Messages
7
Reaction score
1
Points
3
Printer Model
Brother dcp-j4110dw
Hope I post this on the right place, Brother related but maybe also more related to printing photography etc.
Brand new to the forum and tried searching a bit but found a lot of technical things I am not sure I am ready for just yet, at least not without someone holding my hand.

Got my monitor(s) calibrated the other day with a Spyder 4 I got to borrow from my father. Used DisplayCal (older version, not the re-born from GitHub)
It was not that much off, but it is better now. Before that I edited the images and did a test print and re-edited to get the color that was intended (correct on the monitor).
But I can't keep doing this. So this printer do not have any profiles except the standard "cover all" type, and two for Brother paper I do not thing I even can get my hands on atm.

So options as I see it is;
Keep editing the images with trial and error.
Use the "Color Enhancement" from the printer settings and with trial and error try to match screen to print. Unsure if this option is more a "make this color vibrant" than "add more of this".
Make a custom printer profile - issue is I got not tool to measure the colors so it have to be by eye.
Change the monitor to correspond w the colors the printer print (not a fan of as the monitor is used for other things as well).

From what I can see by eye under daylight bulbs compared to professionally printed picture (colors match screen more or less) of the one I try to print myself is that the green is dull (almost matte) brighter green (de-saturated maybe), the red as well. Blue is harder to see. And an over all, everything looks like a step or two de-saturated or faded in a strange way.

Ideas? Options?

Thanks in advance

/ Z
 

Ink stained Fingers

Printer VIP
Platinum Printer Member
Joined
Dec 27, 2014
Messages
6,072
Reaction score
7,245
Points
363
Location
Germany
Printer Model
L805, WF2010, ET8550
,You are lright that Brother does not support actitvely icc profiles when printing. You should not use a driver setting of which the effects are context sensitive e.g. 'Photo enhance' - you don't know what the driver is doing and what the driver is doing differently for different images e.g. contrast enhancement, you can use the standard printer setting and use the color adjustments to reduce differences between printer and monitor, and use that setting for all your images. You do this with a set of standardized test images like these

https://www.northlight-images.co.uk/printer-test-images/#colour_printer_test_images

and not with your own images.

And you do such color adjustments again if you print on another type of paper. This will get you to a somewhat better dolor presentation but not as accurate as an icc-profile . You may look for a used ColorMunki on Ebay and let the search go for a while, The ColorMunki is a pretty practical tool to create your own icc-profiles with ease.

Or you go for an external service provider, various companies selling 3rd party inks and/or papers offer as well
an icc-service - they send you a target patch file which you print , and you return that print to this company which does the patch reading and icc-profile generation. Pricing depends on the size of this target sheet and the patch count.
 

Zandhoeg

Newbie to Printing
Joined
Nov 29, 2024
Messages
7
Reaction score
1
Points
3
Printer Model
Brother dcp-j4110dw
Thank for your answer.
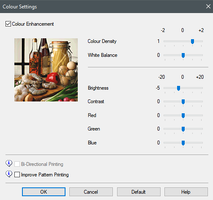
The only way I can adjust colors "through the printer" is with the options i screened and attached.
Not sure if that is the same type of "Photo enhance" you meant.

I will print that test image and see what it spits out.

If the corrections can be done with the settings options I put a screenshot from that would be great. Otherwise I am in the same boat as before where I need to start adjusting things on screen way off to make it look OK on paper.
 

Attachments

  • Screenshot 2024-11-29 173702.png
    Screenshot 2024-11-29 173702.png
    59.3 KB · Views: 46

Ink stained Fingers

Printer VIP
Platinum Printer Member
Joined
Dec 27, 2014
Messages
6,072
Reaction score
7,245
Points
363
Location
Germany
Printer Model
L805, WF2010, ET8550
You can do the color adjustments without the 'enhancements' , that's a variable element you cannot control when and how much colors are adjusted If you think some image needs an adjustment - a boost or whatever - do that in your photo editor.
 

Zandhoeg

Newbie to Printing
Joined
Nov 29, 2024
Messages
7
Reaction score
1
Points
3
Printer Model
Brother dcp-j4110dw
Thank you both.
I will try the test image Peter. Looks like a interesting way.
 

Zandhoeg

Newbie to Printing
Joined
Nov 29, 2024
Messages
7
Reaction score
1
Points
3
Printer Model
Brother dcp-j4110dw
Maybe this test image for colour correction will be helpful?
So I did some print testing.

Added the color working profile I use (Adobe 1998) then printed a version.
As I have no specific printer profile for Adobe I opted to use the printers own color conversion for the test.
M10 was the one that looked most neutral.
However I only got RGB as adjustments in the printer settings. Adding 10% (2 steps out of 20) with the R slider I got something that looks better in the bottom pic but M10 still most neutral looking, however all the white seemed to have a red-ish hue as well.
Added 50% (my slider goes from 0-20, so 10) to check and yes, all white goes slighty red/pink-ish. strangely (?) the M10 is still the most neutral one, only/most apparent change is the redish hue on the white in each picture.
No other picture goes towards being more/less neutral in its colors.

So a thought/question is. If M is Magenta and I can only adjust RGB, and R is M+Y, might there be another way to read the picture as it got both RGB and CMY in the columns. So for a printer with driver adjusting RGB you are supposed to look at the RGB columns and with CMY sliders on the CMY columns?

I did a test with removing 10 from R instead of adding, in the theory that RGB/CMY are somewhat not the same in the test and maybe different depending on printer type/settings, but that did not make much change other than no red tint over the white.

On screen in Photoshop the bottom picture is the most neutral grey maybe along with the R5 and/or B5. Guess this is due to calibration error(s), not exactly same RGB values etc, so the monitor "leans" towards some color slightly, ambient room light etc and so on.

Also tested with 'Color Match Monitor' from the printer settings, no visible effect. sRGB profile make the colors less vibrant/more muted but besides that no change in the calibration image in term of neutral grey.

Did a test changing Relative Colometric to Persceptive but also no visible change.

Not sure if all this is due to the printer drivers color handling, that it is too limited to adjust the small changes, or something else. Going to do a test with the drivers color handling off, and use "printer selected" in color handling in photoshop and see.

Not sure what that would do as the printer would have no profile for the colors other than working profile? Or if it would fall back on some default conversion?

When using color handling Photsohop and using a printer profile you want the printers driver color handling off so not to convert in multiple stages, but what if I disable it in printer then ask photoshop to use the printers handling?

Next test is Printer drivers handling off, Photoshop handling on with a Wide Gamut RGB printer profile.
See if that make any significant difference either way.
 
Last edited:

Zandhoeg

Newbie to Printing
Joined
Nov 29, 2024
Messages
7
Reaction score
1
Points
3
Printer Model
Brother dcp-j4110dw
Just to add some info for people to maybe give feedback on.
Checked the "match monitor" option in the printer drivers. This seem to inactivate the enhanced color option, but also, when I edit colors in Photoshop it does not seem to match those as it "should".

So right now it seems like going w a photoshop printer profile then simply adjust colors on a whim and then print tests pages is the way to go as nothing seems to line up correctly :D
 

Ink stained Fingers

Printer VIP
Platinum Printer Member
Joined
Dec 27, 2014
Messages
6,072
Reaction score
7,245
Points
363
Location
Germany
Printer Model
L805, WF2010, ET8550
As you are not getting the results as expected with the color adjustment mode you may go and get a custom icc-profile for your ink and paper.

Companies like Marrutt offer you to create a custom icc profile for you for free if you buy papers from them

All purchases come with a free custom ICC printer profile which will maximise the quality of your printing.

https://marrutt.com/product-category/papers/semi-gloss-papers/

You may search for a similar offer in your country and look as well for a service doing icc-profiles for you - I have seen that even on Ebay.
 
Last edited:

The Hat

Printer VIP
Platinum Printer Member
Joined
Jan 18, 2010
Messages
15,798
Reaction score
8,831
Points
453
Location
Residing in Wicklow Ireland
Printer Model
Canon/3D, CR-10, CR-10S, KP-3
Colour management can be like rainy days..
It’s sometimes easier to come to terms with them..:hit
 
Top