Time For A 3D Printer Upgrade?!?! Keep, Upgrade, Something else?

Artur5

Printer Master
Joined
Jan 24, 2011
Messages
1,313
Reaction score
1,643
Points
278
Location
Kmt. 0.
Printer Model
MB5150,Pro10s,i3Mk3s+,Voron2.4
@The Hat, I'd prefer that the model and the supports (if any) wouldn't be in a moving platform accelerating and decelerating at a fast pace all the time. That means added vibrations and a heavy load for the Y motor and the bearings, specially with large beds. Either you print slowly or be prepared to accept not so good detail along the Y axis and premature wear of the mechanical parts involved. It's also a possible source of failure. Once I was printing a model with very tall and thin supports (U shaped, just one perimeter) and the fast moving bed made the supports vibrate so wildly that at last one of them crumbled down. That's not usual but it wouldn't happen with a steady bed moving down just a fraction of mm. with each change of layer.
Wishful thinking, I'm afraid. Those CoreXY printers are very expensive beasts (if built properly).

Not a joke this time, but maybe off topic too ?
 
Last edited:

The Hat

Printer VIP
Platinum Printer Member
Joined
Jan 18, 2010
Messages
15,857
Reaction score
8,876
Points
453
Location
Residing in Wicklow Ireland
Printer Model
Canon/3D, CR-10, CR-10S, KP-3
I'd prefer that the model and the supports (if any) wouldn't be in a moving platform accelerating and decelerating at a fast pace all the time. That means added vibrations and a heavy load for the Y motor and the bearings, specially with large beds.
I had similar issues when I started to print thin and tall objects too..

My CR-10’s could print up to 305 mm high and when printing my lamp standard most were 305 mm high, but when going up that high the printed image tended to shake (vibrate) and could end up in a mess if you don’t take special steps.

The problems I found, it wasn’t the bed (X) movement that was causing the problem, it was the (Y) movement, I solved that problem by attaching metal bars from the top of the printer to the wall behind, it was surprising how easy it was to get around that problem.

The newer CR-10s that can print up to 400mm high (Z) but I wouldn’t attempt to go that high just in case the same issues came up again, both my printers are braced to the wall behind.

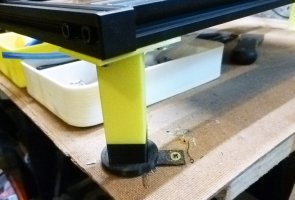
Bracing the uprights to the bottom of the frame was nowhere near as effective as to the wall, the bottom frame legs are also screw to the bench and that makes the whole printer very rigid and stable when printing tall pieces..

P.S. The newer CR-10s can print up to 400mm high, but I reckon that’s pushing it a bit too far on thin pieces..
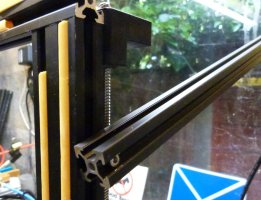
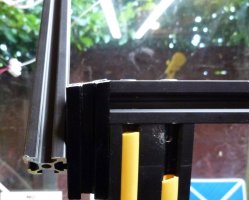
Here's where I braced the printer in two places to the wall and the foot to the bench..

Untitled-1.jpg Untitled-444.jpg
Legs.jpg

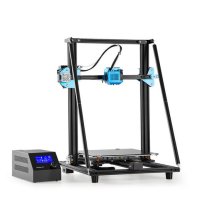
This method of bracing is no where nead as good..
CR-10.JPG
 
Last edited:

Artur5

Printer Master
Joined
Jan 24, 2011
Messages
1,313
Reaction score
1,643
Points
278
Location
Kmt. 0.
Printer Model
MB5150,Pro10s,i3Mk3s+,Voron2.4
In my case, it isn't a real issue unless the supports reach very high. Z max on the Prusa is 21cm so not half as problematic as printers that reach up to 35-40cm high.

A couple of weeks ago, somebody in the Prusa forum advised to replace the stock rubber feet of the machine with a sort of squeezed tires made from PETg. I was exceptical but I printed the set and they work great for reducing the noise, because my Prusa sits inside an enclosure which acts a sort of amplifier for resonances and vibrations. I added also a cork matt between those feet and the floor of the enclosure, Now the noise is considerably lower and possibly the harmful vibrations are also better controlled. In fact, I printed this week a tall model with very frail supports and none failed, although I could see them shaking during the last part of the job.
 

Nifty

Printer VIP
Administrator
Joined
Nov 3, 2004
Messages
3,071
Reaction score
1,439
Points
337
Location
Bay Area CA
Printer Model
CR-10, i560 ,MFC-7440N
Update:

Packing up the printer back into the box with all the padding, packaging, foam, etc. was NOT an easy task. Fortunately, I think I got most things in *about* the same spots as before... and the box closed, so that's good! ;)

Returned via Amazon through UPS without any issues.

I woke up this morning at 4 and couldn't go back to sleep. I noticed I had got an email that the printer was received and my refund had been processed.

... so, I took 2/3 of the $$ and got the Ender-3 V2... which is where I started this whole journey. LOL!
 

Nifty

Printer VIP
Administrator
Joined
Nov 3, 2004
Messages
3,071
Reaction score
1,439
Points
337
Location
Bay Area CA
Printer Model
CR-10, i560 ,MFC-7440N
Now that the dust has settled from holidays, I'm thinking I'll cobble together the Ender-3 V2 this week. It's the most "kit" printer I've put together, so I'm a tiny nervous... and just hoping all the bits fit / work from the factory.

I'm going to follow most of the stuff in this video:

... and maybe some of the stuff in this video:


Nifty

Printer VIP
Administrator
Joined
Nov 3, 2004
Messages
3,071
Reaction score
1,439
Points
337
Location
Bay Area CA
Printer Model
CR-10, i560 ,MFC-7440N
The original instructions often don't have and/or leave out a lot of the stuff that doesn't tend to work and/or things that the community has learned through trial-and-error is "better" than what was originally put in the build instructions.

For example, TONS of people have found that the included pneumatic couplers in the Ender series aren't very good and can cause a lot of issues for how cheap and easy they are to replace from the get-go.
 

The Hat

Printer VIP
Platinum Printer Member
Joined
Jan 18, 2010
Messages
15,857
Reaction score
8,876
Points
453
Location
Residing in Wicklow Ireland
Printer Model
Canon/3D, CR-10, CR-10S, KP-3
The original instructions often don't have and/or leave out a lot of the stuff that doesn't tend to work and/or things that the community has learned through trial-and-error is "better" than what was originally put in the build instructions.

For example, TONS of people have found that the included pneumatic couplers in the Ender series aren't very good and can cause a lot of issues for how cheap and easy they are to replace from the get-go.
I have quite a number of spare pneumatic couplers and if I have an issue with the one provided on the new printer then I simply change it, that’s the beauty of Creality machines..

The Creality self-assembly instruction videos are pretty good and don’t fumble around like others do, the only thing I can’t stand is the Feckin loud music on them..
P.S. I never go by what is said in reviews..👎
 

Lelopes

Getting Fingers Dirty
Joined
Sep 28, 2021
Messages
31
Reaction score
37
Points
48
Printer Model
Canon IX6810
Came here looking for the Voron 2.4 mention... Was not disappointed.
I have being thinkering with my homemade Graber i3 since @thehat gave me a gentle push to it. And I've made my mind that if I would ever build a new printer it should be no less than a Voron 2.4, but with a 400mm x400mm x 400mm volume. The 200mm I am stuck right now make the printer for my use/scenario pretty limited.
 
Top